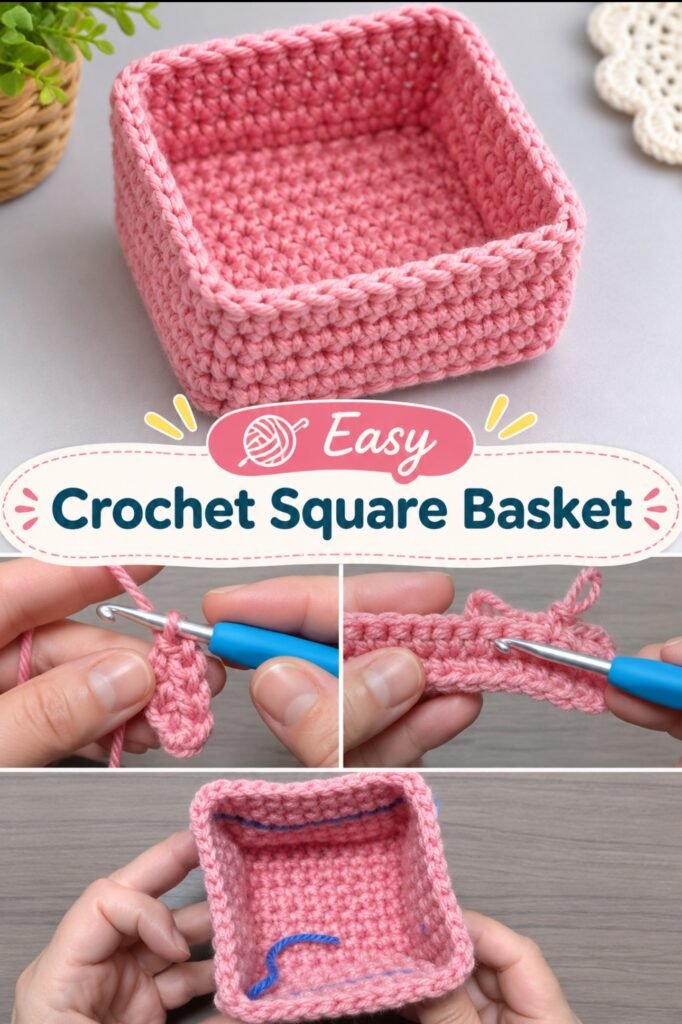
This crochet square basket is a lovely project to try.
With some thick yarn and basic single crochet stitches, you can make a small storage basket for your home.
Use it to hold keys, hair ties, stitch markers, jewelry, or other little things.
The best part? The pattern begins with a simple square made from 12 stitches and 12 rows.
Then, you crochet around the outside to form the basket walls.
A special slip-stitch border makes the top edge firmer and neater. You can also add a pretty contrasting line for decoration.
This simple project is a wonderful way to practice single crochet and learn how to turn a flat piece of crochet into a useful three-dimensional shape.
In this tutorial, you will learn how to crochet the square base, work around all four sides, build the basket walls, and finish the top edge.
You will also find easy stitch instructions, helpful tables, beginner tips, and the original video tutorial.
So, grab your yarn and crochet hook, and let’s make something beautiful!
What Is a Crochet Square Basket?
A crochet square basket is a small handmade container made from yarn.
Unlike round crochet baskets, this design begins with a flat square base.
The base is made using rows of single crochet.
After finishing the square, you work single crochet stitches around its four outside edges.
More rounds of single crochet make the sides stand up and create the basket shape.
The finished basket has four corners, a flat bottom, and a neat upper rim.
This easy design is perfect for storing small items around your home.
You can keep it on a desk, shelf, dressing table, or bedside table.
Why You Will Love This Crochet Square Basket
There are many reasons to make this lovely little basket.
- Beginner-friendly: Uses basic crochet stitches.
- Simple construction: Starts with a flat square made from 12 stitches and 12 rows.
- Useful storage: Holds jewelry, keys, hair accessories, and craft supplies.
- Lovely texture: Single crochet creates a neat handmade finish.
- Sturdy border: Slip stitches help strengthen the upper edge.
- Customizable: Add a contrasting decorative line or leave it plain.
- Great for gifts: A sweet handmade organizer for friends and family.
- Easy to personalize: Choose colors that match your room.
This is also a good project for practicing neat edges and even crochet tension.
Crochet Square Basket: Project Details
Project Detail
Information
Project name
Crochet Square Storage Basket
Skill level
Beginner
Crochet terminology
US terms
Yarn
Super-bulky yarn
Crochet hook
Japanese 7.5/0 (4.5 mm)
Main stitch
Single crochet
Base
12 stitches × 12 rows
First edge round
Single crochet around all four sides
Basket walls
4 rounds of single crochet
Top border
1 round of slip stitches
Decoration
Optional contrasting slip-stitch line
Finished size
Depends on yarn and tension
Best for
Small-item storage and home decor
This basket has a low, open shape that makes it easy to reach inside.
Materials Needed
Before starting, get your yarn and tools ready.
You do not need many supplies.
Material
Details
Main yarn
Super-bulky yarn in your favorite color
Crochet hook
4.5 mm (Japanese 7.5/0)
Contrast yarn
Optional, for the decorative line
Tapestry needle
For weaving in loose yarn ends
Scissors
For cutting yarn
Stitch markers
Optional, for marking the corners
Smaller crochet hook
Optional, for hiding yarn ends
Helpful Yarn Tip
Use yarn that makes a firm crochet fabric.
Thicker yarn can help the basket hold its shape.
The original tutorial uses super-bulky yarn and a Japanese 7.5/0 crochet hook.
If you use a different yarn, choose a hook that creates stitches that are firm but still comfortable to work.
A soft yarn may make a more flexible basket.
Beginner Crochet Stitch Guide
This pattern uses only a few simple stitches.
All instructions use US crochet terms.
Stitch
Abbreviation
Meaning
Chain
ch
Pull yarn through the loop on your hook
Single Crochet
sc
A short, firm crochet stitch
Slip Stitch
sl st
A small stitch used for joining and edging
Stitch
st
One crochet stitch
Row
row
One line of crochet worked back and forth
Round
rnd
Stitches worked around the outside of the piece
Turn
turn
Flip your work to crochet the next row
Fasten Off
FO
Finish your crochet and cut the yarn
How to Make a Chain Stitch
- Make a slip knot and place it on your crochet hook.
- Yarn over.
- Pull the yarn through the loop on your hook.
You have made one chain.
Repeat to create more chains.
How to Make a Single Crochet
Single crochet is the main stitch used in this basket.
- Insert your hook into the next stitch.
- Yarn over and pull up a loop.
- You now have two loops on your hook.
- Yarn over again.
- Pull through both loops.
You have made one single crochet!
How to Make a Slip Stitch
Slip stitches are used to join the rounds and strengthen the rim.
- Insert your hook into the next stitch.
- Yarn over.
- Pull the yarn through the stitch and the loop already on your hook.
You have made one slip stitch.
Keep your tension even.
For the top rim, slightly firm slip stitches can make the edge more stable.
Choosing the Best Yarn and Colors
The yarn you use can change the finished basket.
Thick yarn is a good choice for a small storage basket because it creates a substantial fabric.
Smooth yarn also makes it easier to see your stitches and follow the rows.
You can make the basket in one color or add a contrasting stripe.
Beautiful Color Ideas
Color Combination
Style
Cream and Blue
Soft and classic
Beige and White
Minimalist home decor
Gray and Pink
Gentle and modern
Sage Green and Cream
Fresh and natural
Terracotta and Ivory
Cozy and warm
Mustard and Brown
Earthy and cheerful
Lavender and White
Soft pastel style
Navy and Cream
Simple and elegant
For a first project, try cream yarn with a blue decorative line.
The contrasting color makes the finished edge stand out.
Crochet Square Basket Pattern Notes
Before you start, remember these simple rules.
- The base begins with 12 foundation chains.
- Each base row contains 12 single crochet stitches.
- Work 12 rows to make the square.
- Chain 1 when turning the base; the turning chain does not count as a single crochet.
- Work around all four edges of the completed square.
- On the vertical edges, place one single crochet into the side of each row.
- Work four rounds of single crochet to build the basket walls.
- Finish the upper edge with slip stitches.
- Add the contrasting decorative line only if you like.
Try to keep all four sides even.
The square base is the foundation of the finished basket.
How to Crochet a Square Basket Step by Step
Now it is time to make your basket!
We will start with the square base, work around the edges, build the walls, and finish with a strong rim.
Step 1: Crochet the Foundation Chain
Take your super-bulky yarn and crochet hook.
Make a slip knot.
Start crocheting chains.
Count carefully until you have 12 foundation chains.
Chain 1 more for turning.
This extra chain does not count as a single crochet.
You are ready to begin the first row.
Step 2: Crochet the First Row
Turn your foundation chain so you can see the small bumps along the back.
These bumps are sometimes called the back bumps of the chain.
Insert your hook into the back bump at the base of your turning chain.
Work one single crochet.
Continue working one single crochet into each foundation-chain back bump.
You should have 12 single crochet stitches across the row.
This is Row 1.
Working into the back bumps creates a neat foundation edge.
Step 3: Crochet Row 2
Chain 1.
Turn your work.
Find the first single crochet stitch at the base of the turning chain.
Insert your hook under both top loops of that stitch.
Work one single crochet.
Continue working one single crochet into every stitch across.
You should have 12 stitches.
Your second row is complete!
Step 4: Continue Until Row 12
For each new row:
Chain 1.
Turn your work.
Work one single crochet into the first stitch.
Continue working one single crochet into each stitch across.
Keep repeating the same method until you finish Row 12.
Every row should have 12 single crochet stitches.
Crochet Square Basket Base: Row Table
Row
Instructions
Total Stitches
1
12 sc into foundation-chain back bumps
12
2
Ch 1, turn, 12 sc
12
3
Ch 1, turn, 12 sc
12
4
Ch 1, turn, 12 sc
12
5
Ch 1, turn, 12 sc
12
6
Ch 1, turn, 12 sc
12
7
Ch 1, turn, 12 sc
12
8
Ch 1, turn, 12 sc
12
9
Ch 1, turn, 12 sc
12
10
Ch 1, turn, 12 sc
12
11
Ch 1, turn, 12 sc
12
12
Ch 1, turn, 12 sc
12
Your base is now complete!
Lay it on a flat table.
It should look like a small crochet square.
Helpful Tip
The original creator also suggests that this flat square can be used by itself as an acrylic scrubber, depending on the yarn.
For the storage basket, do not fasten off.
We will continue working around the outside.
How to Crochet Around the Square Base
Now we will make the border that connects the square base to the basket walls.
This step is important because it creates the four lower edges of your basket.
Step 5: Crochet Along the First Side
Chain 1.
Turn your work so you can crochet along the vertical side of the square.
You will work into the ends of the single crochet rows.
Each row has a small edge area where you can insert your hook.
Work one single crochet into the side of each row.
Continue until you have worked along all 12 rows on this edge.
You should have 12 single crochet stitches along the first side.
Try to use the same place on each row edge so the border looks even.
Step 6: Crochet Along the Foundation Chain
Now you are at the next corner.
Find the underside of the original foundation chain.
This is the edge where your project began.
Work one single crochet into each of the 12 foundation-chain positions.
Since the first row was worked into the back bumps, the remaining loops of the foundation chain provide a neat place to insert the hook.
Continue across the entire edge.
You now have a border along two sides of your square.
Step 7: Crochet Along the Second Side
Turn the work to continue along the next vertical edge.
Just as you did on the first side, work one single crochet into each row end.
You should work along 12 rows.
Try to keep your stitch placement neat and even.
When possible, weave the starting yarn tail into the new stitches as you work.
This helps hide the loose end.
Step 8: Crochet Along the Final Edge
Now you are at the last side of your square.
This edge has the tops of the single crochet stitches from Row 12.
Work one single crochet into each stitch across.
At the last corner, the original video shows an additional single crochet worked into the corner area before completing the edge.
This helps the corner turn neatly.
Join with a slip stitch into the first single crochet of the border.
You have finished crocheting around the square base!
Square Base Edge Summary
Side
Where to Crochet
Instructions
Side 1
First vertical edge
1 sc into each of 12 row ends
Side 2
Foundation chain
1 sc into each of 12 chain positions
Side 3
Second vertical edge
1 sc into each of 12 row ends
Side 4
Top of Row 12
1 sc into each stitch, with the corner adjustment shown in the tutorial
The four sides now have a continuous crochet border.
Keep the corner stitches neat rather than adding large increases.
How to Make the Crochet Basket Sides
The base is ready.
Now we will make the walls stand up.
Step 9: Crochet the First Wall Round
Chain 1.
Work one single crochet into the first stitch.
Continue working one single crochet into each stitch around the border.
Work around all four corners in the same way.
You do not need a special corner increase for the wall rounds.
When you reach the beginning of the round, join with a slip stitch into the first single crochet.
The first wall round is complete!
Your square will begin to turn upward.
Step 10: Crochet the Second Wall Round
Chain 1.
Work one single crochet into each stitch around.
Continue across all four sides and corners.
Join with a slip stitch at the end.
Your basket walls will become a little taller.
Step 11: Crochet the Third Wall Round
Repeat the same process.
Chain 1.
Work one single crochet into every stitch around.
Keep your tension even.
Join with a slip stitch.
Your square basket is now taking shape.
Step 12: Crochet the Fourth Wall Round
Chain 1.
Work one single crochet into each stitch around.
Continue until you reach the last stitch.
Join with a slip stitch.
You have finished four rounds of basket walls!
The basket should have a square bottom and four low sides.
Crochet Basket Wall Round Table
Round
Instructions
1
Ch 1, sc in each stitch around, join
2
Ch 1, sc in each stitch around, join
3
Ch 1, sc in each stitch around, join
4
Ch 1, sc in each stitch around, join
Each wall round follows the stitch positions of the round below without deliberate increases or decreases.
How to Reinforce the Basket Rim
This is one of the most useful parts of the project.
The original tutorial uses slip stitches to make the upper edge stronger.
A single crochet edge can sometimes look soft or loose.
Adding slip stitches gives the rim an extra layer of yarn and helps it hold its shape.
Step 13: Work Slip Stitches Around the Top
After joining the fourth wall round, keep your working yarn attached.
Insert your crochet hook into the next stitch along the upper edge.
Yarn over.
Pull through the stitch and the loop on your hook.
You have made one slip stitch.
Continue working one slip stitch into each stitch around the entire top edge.
Try to keep the stitches even.
If the rim feels loose, make the slip stitches a little firmer.
Do not pull them extremely tight, because that could make the basket opening smaller.
Work all the way around the rim.
Step 14: Finish the Reinforced Edge
When you reach the beginning, complete the final slip stitch.
Pull the yarn through toward the inside of the basket.
Chain 1 to secure the end if needed.
Cut the yarn, leaving enough length to weave in.
Use a tapestry needle to hide the yarn end inside the stitches.
The top rim is now reinforced.
How to Add a Decorative Crochet Line
Now you can add a pretty contrasting line around the basket.
This step is optional.
You can keep the basket in one color or choose a second yarn color.
The original tutorial uses surface slip stitches to create a chain-like decorative line.
This adds a lovely handmade detail.
Step 15: Choose the Line Position
Look at the outside of your basket.
Find the upper rim.
Count down approximately two rounds from the top.
This is a lovely place for the decorative line.
You can move the stripe higher or lower if you prefer.
Step 16: Add the Contrasting Yarn
Take your second yarn color.
Make a small starting loop.
Insert your crochet hook from the front to the back of the basket at your chosen starting point.
Catch the new yarn behind the fabric.
Pull a loop through to the front.
This will be the beginning of your decorative line.
Step 17: Make Surface Slip Stitches
Insert your hook into the next stitch position along the same horizontal line.
Catch the yarn from behind the basket.
Pull it through the fabric and the loop on your hook.
You have made one surface slip stitch.
Continue into the next stitch position.
Repeat this method all the way around.
The stitches should look like a small chain resting on the outside of the basket.
Try to keep them a little loose so the decorative line stays visible.
Step 18: Complete the Decorative Line
Continue until you reach your starting point.
Make the last slip stitch.
Pull the yarn through to the inside of the basket.
Cut the yarn.
Weave in the loose ends on the inside.
For a neat finish, hide the contrasting yarn ends behind stitches of the same color wherever possible.
Your decorative line is complete!
Complete Crochet Square Basket Pattern Summary
Section
Instructions
Foundation
Chain 12, plus turning chain
Square Base
12 sc × 12 rows
Edge Side 1
12 sc into row ends
Edge Side 2
12 sc along foundation chain
Edge Side 3
12 sc into row ends
Edge Side 4
Sc across final row and finish corner
Basket Walls
4 rounds of sc
Reinforced Rim
1 round of slip stitches
Decorative Line
Optional surface slip stitches
Finishing
Weave in ends and shape corners
Watch the Original Crochet Square Basket Tutorial
Original pattern and tutorial: Crochet and Knitting Japan (Crochet Japan / クロッシェジャパン).
Helpful Crochet Tips for Beginners
Here are some simple tips for making a neat square basket.
Tip
Advice
Count every row
Keep 12 stitches in each base row
Make even stitches
Try to keep your tension consistent
Use chain back bumps
Create a neat first edge
Crochet into row ends
Work one stitch for each row along the sides
Mark corners
Use stitch markers if you lose your place
Keep walls even
Work into each stitch without adding extra increases
Reinforce the rim
Slip stitches can make the upper edge firmer
Shape the corners
Gently adjust them after finishing
Why Is My Square Base Uneven?
You may have missed a stitch or worked an extra stitch.
Check that each row has 12 single crochet stitches.
Also check that you are working into the first and last stitches of every row.
Why Are My Basket Sides Curling?
The yarn may be too soft or your tension may be very tight.
Try using a hook size that makes a firm but flexible fabric.
You can also shape the corners after completing the basket.
Why Are My Corners Not Square?
The corners may become rounded while you crochet.
This is normal with soft yarn.
Gently push the corners outward with your fingers.
Try to make the four corners look even.
Why Is My Top Edge Loose?
Your single crochet tension may be too relaxed.
The slip-stitch rim helps make the edge firmer.
Work the slip stitches evenly around the opening.
Why Does My Decorative Line Look Tight?
Surface slip stitches can pull the fabric inward when worked too tightly.
Try loosening your tension so the chain-like stitches sit gently on the outside.
Creative Ways to Customize Your Crochet Square Basket
One of the best things about crochet is making something in your own style.
Make a Cream and Blue Basket
Use cream yarn for the basket.
Add a blue decorative line near the upper edge.
This creates a soft, classic look.
Try a Minimalist Basket
Choose one neutral yarn color.
Skip the decorative stripe.
The simple single crochet texture will become the main feature.
Make a Taller Basket
Add a few more single crochet rounds before the reinforced rim.
Keep working one single crochet into each stitch around.
This creates taller sides for storing more items.
Make a Larger Square Base
Start with more foundation chains.
Work enough rows to make a square.
Then adjust the edge stitches to match the new base size.
Add a Fabric Lining
A simple fabric lining can help prevent tiny accessories from slipping between the stitches.
Choose a fabric that matches your yarn color.
Measure your finished basket before cutting the lining.
Make a Matching Set
Crochet several baskets using the same pattern.
Make them in different colors and place them together on a shelf.
Fun Ways to Use Your Crochet Storage Basket
This little basket can be useful in many places.
- Bedroom: Store jewelry, hair ties, and small accessories.
- Entryway: Keep your keys in one place.
- Desk: Hold paperclips, sticky notes, and small stationery.
- Craft room: Store stitch markers, yarn needles, and small crochet tools.
- Bathroom shelf: Keep dry hair accessories and cotton pads organized.
- Gift basket: Fill it with small handmade presents.
- Living room: Use it as a cute decorative organizer.
The square shape fits nicely onto shelves and other flat surfaces.
More Easy Crochet Projects to Try
If you enjoyed making this crochet basket, you may also like these USESEW projects.
Try our Easy Crochet Cat Basket for a cute organizer with little cat ears.
You can also make an Easy Crochet Market Bag if you enjoy practical handmade accessories.
For a quick and adorable project, explore our Crochet Cat Paw Coaster.
These projects are lovely ways to practice crochet and make useful handmade items.
How to Care for Your Crochet Square Basket
A little care can help your basket stay neat.
Care Step
What to Do
Cleaning
Spot clean with a damp cloth and mild soap
Washing
Follow the instructions on your yarn label
Drying
Let the basket air dry completely
Reshaping
Gently adjust the corners while damp
Storage
Keep the basket in a clean, dry place
Decorative Line
Avoid pulling on the surface stitches
Reinforced Rim
Check that the stitches remain secure
If your basket loses its shape, gently reshape it by hand.
A folded towel placed inside while drying can help support the walls.
Frequently Asked Questions
Is this crochet square basket good for beginners?
Yes! The main pattern uses basic chain, single crochet, and slip stitches. The most challenging part may be finding the correct places to work along the sides of the square.
What yarn is best for a crochet square basket?
Thick yarn that creates a firm fabric works well. The original tutorial uses super-bulky yarn.
What size crochet hook should I use?
The original tutorial specifies a Japanese 7.5/0 hook, approximately 4.5 mm.
How many stitches are in the square base?
The base has 12 single crochet stitches in each row.
How many rows are in the base?
The base is made with 12 rows of single crochet.
How many rounds make the basket walls?
The basket walls are built with four rounds of single crochet after the base edging.
How do I make the basket corners?
Work around the four edges of the square base, then crochet the wall rounds without deliberate corner increases. Gently shape the corners after finishing.
Why do we use slip stitches around the rim?
Slip stitches add another layer of yarn around the opening and help make the top edge feel firmer.
Do I need the decorative line?
No. The contrasting line is completely optional.
Can I make the basket taller?
Yes. Add more rounds of single crochet before working the top rim.
Can I make the basket wider?
Yes. Begin with more chains and work enough rows to create a larger square base.
Can I use cotton yarn?
Yes. Choose cotton yarn with a suitable thickness and hook size. A firm cotton yarn can make a useful basket.
What can I store in this basket?
You can use it for keys, jewelry, hair ties, stitch markers, small craft supplies, and other lightweight accessories.
Where can I watch the original tutorial?
The original Crochet and Knitting Japan tutorial is linked above.
Final Thoughts
This easy crochet square basket is a lovely way to turn basic stitches into something useful.
The flat 12-stitch square base creates a simple foundation.
The four rounds of single crochet form the basket walls, while the slip-stitch rim adds a firm, finished edge.
You can keep the design simple or add a colorful decorative line for a special touch.
Make the basket in cream, gray, sage green, or your favorite color.
Use it on your desk, dressing table, shelf, or craft table.
It also makes a sweet handmade gift for someone who loves practical crochet projects.
Take your time, enjoy every stitch, and have fun making your own little storage basket.
For more free crochet patterns, beginner-friendly tutorials, and handmade gift ideas, explore USESEW.com.
Happy crocheting!