

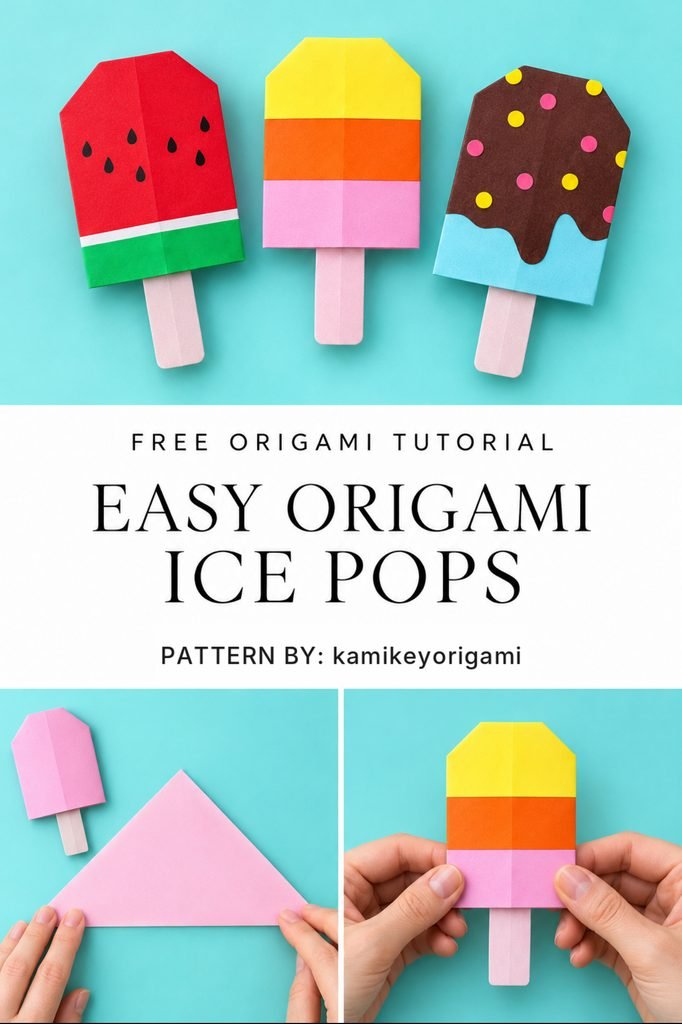
Bright colors, a tiny paper stick, and a sweet summer craft!
Do you love colorful paper crafts that are fun and easy to make?
These easy origami ice pops are a lovely project to try.
With a few simple paper folds, you can make cute paper popsicles that look like your favorite frozen treats.
Make a red watermelon pop, a pink strawberry pop, or a sunny yellow lemon pop.
You can use them to decorate cards, make summer party decorations, or give them to friends.
The best part? You do not need fancy craft tools.
All you need is colorful paper, a small brown paper strip, and a little time.
This easy folded-paper project is perfect for beginners, families, and anyone who loves making cute things.
So, grab your favorite paper, find a comfy spot, and let’s make some sweet summer crafts!
What Are Origami Ice Pops?
Origami ice pops are small paper decorations shaped like frozen popsicles.
They have a long paper body, a simple top, and a little stick at the bottom.
You can make them in many different colors to look like real ice pops.
This easy version is a flat, origami-inspired paper craft. The body is made with simple folds, and a small paper stick is attached at the end.
It is light, colorful, and easy to use in other crafts.
You can make just one or create a whole set of paper ice pops for a summer display.
Why You Will Love These Easy Origami Ice Pops
There are many reasons to try this cute project.
- Beginner-friendly: Uses easy folds and simple shapes.
- Budget-friendly: You only need a little colored paper.
- Fun for kids: A great screen-free summer activity.
- Quick to make: No long list of steps or special tools.
- Colorful: Make your favorite ice pop flavors with paper.
- Great for gifts: Add them to cards or gift wrapping.
- Easy to change: Make them big, small, plain, or patterned.
- Fun to decorate: Add seeds, stripes, or cute faces.
This is a lovely craft when you want to make something cheerful without spending much money.
Origami Ice Pops: Project Details
| Project Detail | Information |
|---|---|
| Project name | Easy Origami Ice Pops |
| Skill level | Beginner |
| Craft type | Origami-inspired paper folding |
| Main material | Square colored paper |
| Paper size | 15 × 15 cm |
| Other material | Small brown paper strip |
| Tools | Scissors, glue or tape, optional markers |
| Finished shape | Flat paper popsicle |
| Best for | Summer crafts, cards, gifts, and decorations |
You can change the size of your ice pop by using a larger or smaller square.
Materials Needed
Before you start, get your paper and tools ready.
You do not need many things for this project.
| Material | Details |
|---|---|
| Origami paper | One 15 × 15 cm square in your favorite color |
| Brown paper | One small 2 × 7 cm rectangle for the stick |
| Scissors | To cut the brown paper strip |
| Glue or tape | To attach the stick |
| Markers | Optional, for seeds, faces, or other details |
| Ruler | Optional, to help measure the paper |
Helpful tip: Thin origami paper is easy to fold and helps you make neat edges.
If you do not have origami paper, you can cut a square from normal colored paper.
Choosing the Best Paper for Your Ice Pops
The paper you choose can make your ice pops look different.
Thin colored paper is a good choice because it is easy to fold.
A 15 × 15 cm square works well for beginners. It is big enough to hold while you make each fold.
You can also use smooth paper with simple patterns.
Try bright colors for a fun summer look.
Beautiful Ice Pop Color Ideas
| Paper Color | Ice Pop Idea |
|---|---|
| Red with Black Dots | Watermelon |
| Light Pink | Strawberry |
| Bright Yellow | Lemon |
| Orange | Orange Ice Pop |
| Purple | Grape |
| Light Green | Melon |
| Brown and Cream | Chocolate Vanilla |
| Pink and Blue | Cotton Candy |
You can make one color or add paper strips in another color.
Choose colors that make you happy!
How to Make Easy Origami Ice Pops
Now it is time to make your paper ice pop!
This simple version uses an easy folded rectangle for the body, two folded corners for the top, and a small paper stick.
Follow each step slowly.
Step 1: Start With a Square Paper
Take one 15 × 15 cm square of colored paper.
Place it on the table with the colored side facing down.
Keep one edge at the top and one edge at the bottom.
Smooth the paper with your hand.
Step 2: Make the Center Fold
Fold the left side over to the right side.
Press the fold gently.
Open the paper again.
You should now see one straight crease down the middle.
This line will help you make even folds.
Step 3: Fold Both Sides to the Middle
Take the left edge of the paper.
Fold it inward until it meets the center crease.
Press the fold flat.
Now take the right edge.
Fold it inward until it meets the same center crease.
Your square will now look like a long rectangle, about 7.5 cm wide.
The two folded edges should meet neatly in the middle.
Step 4: Turn the Paper Over
Carefully turn your folded paper over.
You should now see the smooth colored side.
The folded edges will be at the back.
Keep the shorter edge at the top.
This will be the front of your ice pop.
Step 5: Shape the Top
Look at the two top corners.
Fold the top-left corner toward the back by about 1.5 cm.
Press the crease.
Do the same with the top-right corner.
Try to make both corners the same size.
Your ice pop will now have a soft, angled top instead of sharp square corners.
You can make the corner folds a little smaller if you like a wider top.
Step 6: Fold the Bottom Edge
Take the bottom edge of your paper.
Fold it toward the back by about 2 cm.
Press the fold flat.
This makes a neat lower edge and helps keep the folded sides in place.
Your main ice pop body is ready!
Step 7: Make the Paper Stick
Take your small brown paper rectangle.
It should be about 2 cm wide and 7 cm long.
Fold it in half along its long side.
Press the fold.
You now have a narrow paper stick about 1 cm wide.
If you want a stronger stick, you can use slightly thicker brown paper.
Step 8: Attach the Stick
Turn your ice pop over.
Place the brown stick in the middle of the bottom edge.
Slide about 4 cm of the stick behind the paper body.
Leave about 3 cm showing below the ice pop.
Use a small piece of tape or a little craft glue to hold it in place.
Let the glue dry if needed.
Turn the ice pop back over.
You now have a cute paper popsicle!
Step 9: Add Fun Details
Now you can make your ice pop extra cute.
Use a black marker to draw small watermelon seeds.
Add tiny dots for strawberry ice cream.
Draw a happy face with two little eyes and a smile.
Or keep your ice pop plain for a simple look.
You can also glue a small strip of another paper color across the front for a two-color design.
Step 10: Make More Ice Pops
Try making another ice pop in a new color.
You could make a pink one, a yellow one, and a purple one.
Place them side by side and enjoy your sweet paper collection.
Your easy origami ice pops are finished!
Easy Origami Ice Pops: Step-by-Step Table
Use this table to remember the folding steps.
| Step | What to Do | Helpful Tip |
|---|---|---|
| 1. Prepare Paper | Place a 15 × 15 cm square color-side down | Use smooth paper |
| 2. Center Crease | Fold in half vertically, then open | Make the crease straight |
| 3. Fold Sides | Fold both side edges to the middle | Keep both sides even |
| 4. Turn Over | Flip to the smooth colored side | Keep the short edge on top |
| 5. Shape Top | Fold the top corners backward | Make both corners match |
| 6. Shape Bottom | Fold the bottom edge back about 2 cm | Press the fold flat |
| 7. Make Stick | Fold a 2 × 7 cm brown paper strip lengthwise | Keep it straight |
| 8. Attach Stick | Secure it at the back with glue or tape | Center the stick |
| 9. Decorate | Add seeds, stripes, or a smile | Use your favorite colors |
| 10. Finish | Make more ice pops in other colors | Create a summer set |
How to Make Two-Color and Three-Color Paper Ice Pops
Want to make your paper ice pops even more colorful?
Try adding bright paper bands.
This is an easy way to make your craft look like a real frozen treat with different flavors.
Two-Color Ice Pop
First, make the paper ice pop body.
Next, cut a small strip of paper in another color.
Place it across the lower half of your ice pop.
Fold any extra paper around the sides toward the back.
Use a little glue to hold the strip in place.
Now your ice pop has two colors!
Three-Color Ice Pop
Start with a plain paper ice pop.
Choose two more paper colors.
Cut two small paper bands.
Place one band near the top and the other near the bottom.
Leave part of the main color showing between them.
Glue the paper bands in place.
You now have a pretty three-color ice pop.
Fun Flavor Combinations
| Colors | Sweet Design |
|---|---|
| Red, White, Green | Watermelon Ice Pop |
| Orange, Yellow, White | Citrus Ice Pop |
| Pink, Blue, White | Cotton Candy Ice Pop |
| Brown, Cream, Pink | Chocolate Strawberry |
| Purple, Pink, White | Berry Ice Pop |
You can also add tiny paper hearts, dots, or lines.
Have fun making your own designs!
More Origami Ice Pop Inspiration
Origami ice pop design by Japanese paper artist Kamikey.
Her video shows a different folding method and colorful ice pop designs, including watermelon and soda-inspired versions.
Watch the original tutorial here:
Ice Pops Origami — Kamikey on YouTube
Original origami design: Kamikey.
The simple folded-paper craft in this article is a separate project with different construction steps.
Helpful Paper Folding Tips for Beginners
Making paper crafts is easier when you take your time.
Here are some little tips that can help.
| Tip | Easy Advice |
|---|---|
| Start with a square | Make sure all four sides are equal |
| Fold slowly | Line up the paper edges before pressing |
| Make neat creases | Use your finger to smooth each fold |
| Use thin paper | Thick paper may be harder to fold |
| Work on a table | A flat surface makes folding easier |
| Keep corners even | Make the two top folds the same size |
| Use a little glue | Too much glue can make paper wrinkle |
| Let glue dry | Give the stick time to stay in place |
What If Your Ice Pop Looks Uneven?
Open the last fold and try again.
Make sure the two side edges meet at the center line.
You do not need to rush.
What If the Paper Keeps Opening?
Press your folds more firmly.
You can also place a tiny piece of tape on the back if needed.
What If the Stick Falls Off?
Try adding a little more glue or a stronger piece of tape.
Make sure the brown paper strip is attached to the back of the main body.
Creative Ways to Decorate Your Origami Ice Pops
One of the best things about paper crafts is making each project your own.
Here are some fun ideas.
Watermelon Ice Pop
Use red paper for the main body.
Add a small green paper strip at the bottom.
Use a black marker to draw tiny seeds.
Your paper pop will look like a sweet watermelon treat.
Strawberry Ice Pop
Choose light pink or red paper.
Draw small dots or tiny seeds.
Add a little smiling face if you like.
Chocolate Ice Pop
Use brown paper.
Add a cream-colored band near the top.
You can draw little sprinkles or tiny hearts.
Rainbow Ice Pop
Choose several bright paper colors.
Cut narrow strips and glue them across the front.
Make sure each strip is smooth and neat.
Cute Ice Pop With a Face
Add two little black eyes.
Draw a small smile.
You can even add pink cheeks.
This is a fun way to make a sweet paper character.
Fun Ways to Use Your Paper Ice Pops
These little paper crafts are not just fun to make.
You can use them in many cute ways.
- Summer party decorations: Tape several ice pops to a wall or party board.
- Handmade greeting cards: Glue one to the front of a summer card.
- Gift wrapping: Add a small paper ice pop to a wrapped gift.
- Classroom crafts: Use them for a simple seasonal craft activity.
- Paper garlands: Attach several to a string for bright summer decorations.
- Scrapbook pages: Add a paper pop to a summer memory page.
- Play shop: Make a paper ice cream shop with lots of fun flavors.
You can also write a little message on the back and give one to a friend.
Other Easy Summer Paper Craft Ideas
If you love folding paper, there are many more cute projects to try.
You can make little paper flowers, butterflies, hearts, or fruit shapes.
These are fun for cards, gifts, and room decorations.
Try making a paper fruit collection with strawberries, watermelon slices, and colorful ice pops.
Or make a summer craft board with bright paper flowers and cheerful shapes.
Use colors that match your room, party, or favorite season.
A few small paper crafts can turn into a lovely handmade display.
How to Care for Your Origami Ice Pops
Paper crafts need a little care to stay neat.
| Care Tip | What to Do |
|---|---|
| Keep dry | Do not leave paper near water |
| Handle gently | Avoid pulling on the paper stick |
| Keep away from strong sun | Bright sunlight may fade paper colors |
| Store flat | Keep in a box or folder |
| Avoid heavy objects | Do not put books or heavy items on top |
| Check the stick | Make sure the glue or tape stays secure |
If your paper becomes bent, gently smooth it with your fingers.
Do not use water to fix the folds.
Frequently Asked Questions
Are origami ice pops easy for beginners?
Yes! This simple folded-paper version uses basic folds that are easy to learn. Young children may need help with scissors and glue.
What paper should I use?
Thin origami paper is a good choice. You can also use colored craft paper cut into a square.
What size paper is best?
A 15 × 15 cm square works well for beginners. You can also try a smaller or larger square.
Can I make a paper ice pop without glue?
You can fold the main body without glue. For this version, a little tape or glue helps attach the paper stick.
Can I make two-color origami ice pops?
Yes. Add a paper strip in another color to the front of your folded ice pop.
Can kids make this craft?
Yes, with help when needed. It is a fun paper craft for children who enjoy simple folding and decorating.
Can I use printer paper?
Yes. Cut it into a square before you begin. Colored printer paper will give you a brighter finished craft.
Can I make smaller ice pops?
Yes! Start with a smaller square and use a smaller paper stick. Very small pieces may be harder for beginners to fold.
Can I hang these paper ice pops on a wall?
Yes. You can use small pieces of removable tape or attach them to a paper garland.
Is this paper ice pop three-dimensional?
No. This easy version is a flat folded-paper decoration, which makes it useful for greeting cards, scrapbook pages, and wall displays.
Final Thoughts
These easy origami ice pops are a sweet way to enjoy a little summer crafting.
With a few simple folds, colorful paper, and a tiny paper stick, you can make a cute decoration that looks like your favorite frozen treat.
Make one in bright red, soft pink, sunny yellow, or any color you love.
Add little seeds, stripes, or smiling faces to give each ice pop its own style.
You can make a whole paper ice cream shop, decorate summer cards, or create lovely handmade gifts.
The most fun part is making each paper ice pop a little different.
For more easy origami, fun paper crafts, and beginner-friendly DIY ideas, explore usesew.com.
Happy folding!


