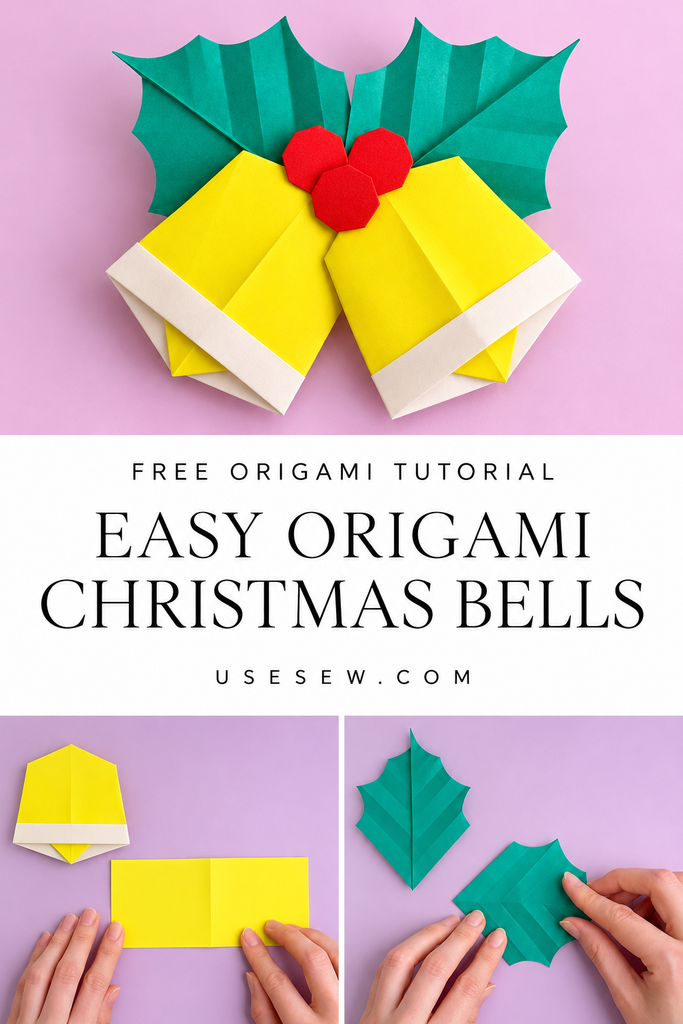
A classic holiday shape, a cheerful jingle, and a sweet paper decoration that is hard not to love!
What if your favorite Christmas tree ornaments could be made with just a single sheet of paper?
Just add the magic of simple origami!
This charming paper Christmas bell is a festive, recognizable holiday symbol that you can make in minutes. You can hang it on your tree, use it as a cute gift topper, or string several together to make a cheerful garland.
The best part? You do not need any special tools, glue, or expensive materials to make it.
With just one square of festive paper and a simple pen, you can create a fully expressive, three-dimensional holiday decoration.
The design is simple, but it completely transforms a flat piece of paper into a playful work of art. It makes your holiday decor sweet, fun, and full of handmade charm.
Whether you love traditional paper crafts, quick creative projects, or screen-free holiday activities, this little project is absolutely worth trying.
In this article, we will look at the bell design, materials, step-by-step folding instructions, and helpful tips. You can also watch the original video to see exactly how the body, hanger, and details are shaped.
What Is an Easy Origami Christmas Bell?
An easy origami Christmas bell is a simplified, beginner-friendly paper version of the classic holiday jingle bell.
It features a rounded bell shape, a folded top loop for hanging, and a cute little clapper in the center. Instead of complex folding for the tiny details, the center clapper and decorative elements are often drawn on with a pen or added with a tiny scrap of paper, making the process much faster and more accessible.
The paper design gives the bell a lightweight, delicate look while maintaining a classic, recognizable silhouette.
In this tutorial, the creator shares a brilliant, streamlined method that is perfect for crafters of all ages. She guides you through aligning the corners, shaping the bell, and adding the final festive details.
This is a fun, quick way to create personalized holiday decor, charming handmade gifts, or delightful classroom crafts.
Why You Will Love This Origami Christmas Bell
There are many reasons to love this little project:
- Beginner-friendly: Uses basic, easy-to-follow paper folding techniques.
- Quick to make: Can be completed in just a few minutes with minimal materials.
- Expressive results: Drawing or adding simple details allows for endless personality and charm.
- Budget-friendly: Requires only standard origami paper and a pen.
- Customizable: Easy to change colors, patterns, or sizes to suit your holiday theme.
- Great for kids: A safe, screen-free activity that helps develop fine motor skills and patience.
- Useful folding skill: Teaches you how to create sturdy, three-dimensional paper shapes from a simple square.
Materials Needed
Before you start, get your paper and tools ready. You do not need many things for this project.
| Material | Details |
|---|---|
| Origami Paper | 1 sheet of standard square origami paper (15cm x 15cm is ideal) |
| Contrasting Paper | 1 tiny scrap of yellow or gold paper for the clapper (optional) |
| Pen or Marker | A black or metallic fine-tip pen to draw details |
| String or Ribbon | A short piece of thread or thin ribbon for hanging |
| Bone Folder (optional) | To help make sharp, precise creases |
| Flat Surface | A table or desk to fold on |
Helpful note: The creator specifically designed this model to be easy and accessible, avoiding complex sinks or intricate folds so that crafters of all ages can succeed.
Choosing the Best Paper for Your Origami Bell
The paper you choose can change how your bell looks and functions.
For a classic, structured look, standard 15cm x 15cm origami paper works beautifully. Traditional origami paper has one colored side and one white side, which can create a lovely two-tone effect if folded intentionally.
You may want to use solid holiday colors to mimic classic ornaments, or patterned paper to add a pop of unexpected visual interest.
Try to choose paper that feels smooth and folds crisply without tearing easily.
Beautiful Color Ideas
| Color Combination | Style Vibe |
|---|---|
| Classic Red and White | A traditional look that mimics vintage holiday ornaments. |
| Forest Green and Gold | A rich, elegant vibe perfect for a sophisticated tree theme. |
| Icy Blue and Silver | A cool, winter wonderland aesthetic. |
| Patterned or Floral | Beautiful holiday prints for a unique, decorative display piece. |
| Metallic or Foil | A shiny, festive option that catches the tree lights beautifully. |
You can choose colors that match your favorite room decor or your specific holiday theme.
How Is the Origami Christmas Bell Made?
The original video shows how to fold the bell in distinct, logical sections.
The maker starts by creating a diagonal fold to form a triangle base. She then folds the bottom corners up to the top point to create a smaller diamond shape.
Next, she folds the side edges inward to shape the curved body of the bell, and folds the top point downward to create a sturdy hanging loop.
The last step is adding a tiny contrasting square for the clapper, or simply using a pen to draw the center details and a hanging string, bringing the festive character to life instantly.
Step-by-Step Instructions
Step 1: Base Fold
Start with a square sheet of paper, colored side up. Align the diagonal corners and fold in half to form a triangle.
Step 2: Form the Diamond
Fold the bottom left and right corners up to meet the top point, creating a smaller diamond shape.
Step 3: Shape the Bell
Fold the left and right outer corners inward toward the center vertical line to shape the curved sides of the bell.
Step 4: Create the Hanger
Fold the top point downward over the front to create the loop or hanger of the bell.
Step 5: Add the Clapper
Fold a tiny scrap of yellow or gold paper into a small square or rectangle, and tuck or glue it into the center bottom of the bell.
Step 6: Draw the Details
Turn the bell over if needed, and use a pen to draw a decorative center line, a hanging string at the top, and any festive patterns.
Quick Folding Reference Table
| Step | Action |
|---|---|
| 1. Base Fold | Start with a square sheet of paper, colored side up. Align the diagonal corners and fold in half to form a triangle. |
| 2. Form the Diamond | Fold the bottom left and right corners up to meet the top point, creating a smaller diamond shape. |
| 3. Shape the Bell | Fold the left and right outer corners inward toward the center vertical line to shape the curved sides of the bell. |
| 4. Create the Hanger | Fold the top point downward over the front to create the loop or hanger of the bell. |
| 5. Add the Clapper | Fold a tiny scrap of yellow or gold paper into a small square or rectangle, and tuck or glue it into the center bottom of the bell. |
| 6. Draw the Details | Turn the bell over if needed, and use a pen to draw a decorative center line, a hanging string at the top, and any festive patterns. |
Watch the Original Origami Christmas Bell Tutorial
Want to see exactly how this clever paper decoration is shaped and assembled?
The original video provides clear, step-by-step guidance on folding the body, shaping the hanger, and the simple trick of adding the final festive details. You can watch the maker work and see how a flat sheet of paper transforms into a charming holiday ornament.
Watch the full video tutorial below:
Original video: Origami Easy Cute Christmas Bells Paper Craft DIY
Original paper folding tutorial demonstrated by 折り紙チャンネル Origami Paper Craft.
Helpful Paper Folding Tips for Beginners
Making an origami Christmas bell can be easy when you take your time. Here are some tips to help you:
| Tip Category | Advice |
|---|---|
| Crisp Folds | Use your fingernail or a bone folder to make sharp, precise creases. This makes the final model much sturdier and neater. |
| Symmetry Matters | Try to match your left and right folds as closely as possible so your bell hangs straight and looks balanced. |
| Gentle Handling | Paper can tear if forced. If a fold feels stuck, unfold it slightly and realign the edges before pressing down again. |
| Secure the Clapper | If using a separate piece of paper for the clapper, a tiny dot of craft glue will keep it perfectly in place. |
Creative Ways to Customize Your Origami Bell
One of the best things about paper crafts is making something in your own style. Here are some fun ideas:
- Add Glitter: Use a glue pen to add sparkling details to the edges or the center of the bell.
- Make a Garland: Fold multiple bells in varying sizes and colors, then thread them onto a long piece of ribbon to create a festive garland.
- Themed Patterns: Match the paper to a specific holiday theme, like plaid for a rustic look or snowflakes for a winter wonderland.
- Interactive Elements: Instead of drawing the clapper, glue on a tiny jingle bead or a small pom-pom for a fun, 3D effect.
How to Style and Display Your Origami Christmas Bell
A handmade origami bell can bring joy in many different ways:
- For tree decor: Hang them directly on your Christmas tree branches using thin, clear thread for a floating effect.
- For kids: Use them as fun, screen-free holiday activities or as handmade ornaments for their own miniature tree.
- As a gift topper: Tape a tiny bell to the ribbon of a wrapped present for a personalized, handmade touch.
- Window display: Suspend them at varying heights in a window to catch the winter sunlight.
The lightweight texture and classic shape make this craft a versatile standout piece in any holiday setting.
Other Ways to Use This Paper Folding Technique
The folding methods in this video are highly versatile. They can also be useful for other paper craft projects.
You may use similar diamond-base folding techniques to create other holiday shapes, like simple stars or trees. You can try it to make geometric ornaments for a New Year’s celebration. You can also use it to create simple, folded gift tags or place cards for a holiday dinner.
The best part is that once you master these basic shaping techniques, you can apply them to almost any decorative paper project.
How to Care for Your Origami Christmas Bell
A handmade paper craft needs gentle care to stay looking its best:
| Care Step | Instruction |
|---|---|
| Handling | Handle with care. Avoid squeezing the bell too hard, which can crush the folded edges or hanger. |
| Keep Dry | Keep the ornament away from moisture, rain, or humid areas, as paper can warp or become brittle. |
| Avoid Direct Sunlight | Prolonged exposure to direct sunlight can fade the colors of the paper and the drawn details over time. |
| Storage | Store them flat in a dry box or hang them in a closet to maintain their three-dimensional shape until next year. |
This will help keep your bell crisp, structured, and neat for many holiday seasons to come.
Frequently Asked Questions
Is this origami project good for beginners and kids?
Yes, absolutely. It uses basic, easy-to-follow folds, and drawing the details at the end makes it very forgiving and fun for children.
Can I use regular printer paper instead of origami paper?
Yes. You can cut a standard sheet of printer paper into a perfect square, and it will work just fine, though it may not have the classic two-tone color effect.
Why will not my bell hang straight?
Make sure your top hanger fold is crisp and centered. If the base folds are symmetrical, the bell will hang perfectly straight.
Can I make the bell larger or smaller?
Yes. Simply use larger or smaller square paper. A 15cm square is standard, but you can go up to 20cm for a larger display piece or down to 7.5cm for a miniature ornament.
Where can I find the full folding instructions?
Watch the original YouTube video linked above. The creator provides excellent, close-up visuals of every fold, making it easy to follow along at your own pace.
Final Thoughts
This easy origami Christmas bell is a beautiful way to bring classic holiday cheer to life using nothing but paper and a little creativity.
The traditional shape is timeless, and the clever, simplified folding design makes it surprisingly quick and accessible for everyone.
The simple, repetitive folds make this a highly relaxing project to work on while listening to holiday music or unwinding after a long day.
You can make your bell in classic red, forest green, metallic gold, or any color that speaks to your personal holiday style.
Watch the original video to see how the creator brings this sweet, versatile paper decoration to life.
Happy folding!