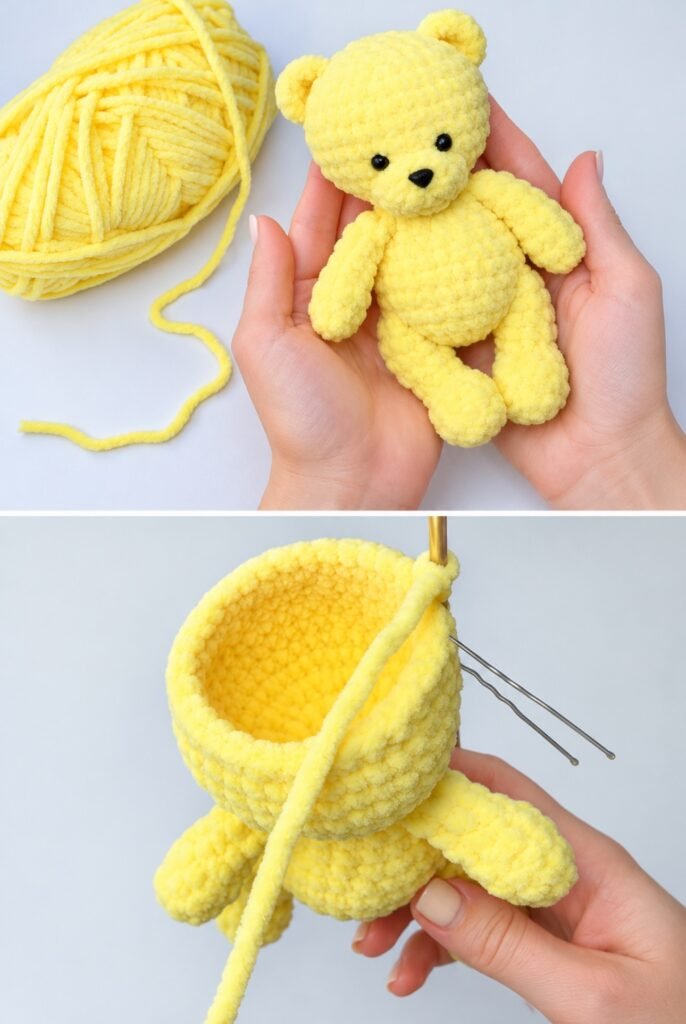
Two cute little ears, one round tummy, and a sweet handmade teddy bear!
Do you love small crochet projects that are easy to make?
This one hour crochet bear is a lovely project to try.
With some soft yarn, a crochet hook, and a few basic stitches, you can create an adorable little bear for your desk, bookshelf, or handmade gift collection.
The best part? You do not need complicated crochet techniques.
This bear uses simple single crochet stitches, increases, and decreases to create its round head and chubby body.
Add four little limbs, two round ears, and a sweet embroidered face to bring your teddy to life.
The project is inspired by the idea of making a small amigurumi bear in about one hour. If you are new to amigurumi, take your time and enjoy the process.
In this beginner-friendly tutorial, you will learn how to crochet the head, shape the body, make the ears and limbs, and sew everything together.
You will also find a helpful stitch guide, easy round-by-round tables, troubleshooting tips, and a video tutorial for extra inspiration.
So, grab your favorite yarn and let’s crochet a cute little teddy!
What Is a One Hour Crochet Bear?
A one hour crochet bear is a small teddy bear made with amigurumi crochet techniques.
Amigurumi is the art of crocheting small stuffed toys and characters.
Most amigurumi projects use single crochet stitches worked in continuous rounds.
This creates a firm fabric that can hold soft polyester stuffing.
A small crochet teddy bear usually has a round head, a little body, two ears, two arms, and two legs.
For this simple version, the head and body are made together, while the ears and limbs are crocheted separately.
This makes the main shape easy to build without sewing two large pieces together.
The finished bear can become a sweet shelf decoration or a handmade gift.
Why You Will Love This Easy Crochet Bear Pattern
There are many reasons to make this cute little bear.
- Beginner-friendly: Uses basic single crochet stitches.
- Quick project: A small design without complicated color changes.
- Soft and cute: A round head and chubby tummy create a classic teddy look.
- Great for gifts: Make one for birthdays, holidays, or special occasions.
- Uses little yarn: A lovely project for leftover yarn.
- Easy to customize: Change the color or add a small accessory.
- Useful crochet skills: Learn increases, decreases, stuffing, and sewing.
- Fun to display: Place your finished bear on a desk or shelf.
You can make one bear in classic brown or create a collection in beautiful pastel colors.
One Hour Crochet Bear: Project Details
Here is a quick overview before you start.
Project Detail
Information
Project name
One Hour Crochet Bear
Craft type
Amigurumi
Skill level
Confident beginner
Crochet terminology
US terms
Main stitch
Single crochet
Special stitches
Increase and invisible decrease
Yarn
DK or worsted-weight yarn
Crochet hook
Approximately 2.5–3.5 mm
Main body
Head and torso worked together
Arms
2 separate pieces
Legs
2 separate pieces
Ears
2 separate pieces
Facial details
Embroidered with yarn
Finished size
Depends on yarn, hook, and tension
Completion time
Varies with experience
This is a compact amigurumi bear with a simple rounded shape.
Materials Needed
Before starting, prepare your yarn and crochet tools.
You do not need many supplies.
Material
Details
Main yarn
DK or worsted-weight cotton or acrylic-blend yarn
Yarn amount
A small ball, with approximately 50 g as a starting allowance
Crochet hook
2.5–3.5 mm, depending on yarn
Polyester fiberfill
For stuffing the head, body, and legs
Black embroidery yarn
For the eyes and nose
Tapestry needle
For sewing pieces together
Scissors
For cutting yarn
Stitch marker
To mark the beginning of each round
Pins
Optional, to hold the ears and limbs before sewing
Helpful tip: Choose a crochet hook that creates firm stitches without large gaps.
This will help stop the stuffing from showing through the fabric.
For this version, use embroidered eyes and a nose instead of small plastic parts.
Beginner Amigurumi Stitch Guide
This little bear uses just a few crochet stitches.
All instructions use US crochet terminology.
Stitch
Abbreviation
Meaning
Magic ring
MR
An adjustable ring used to begin crocheting
Chain
ch
Pull yarn through the loop on the hook
Single crochet
sc
A short, firm crochet stitch
Increase
inc
Work 2 sc in the same stitch
Invisible decrease
dec
Join two stitches into one through their front loops
Slip stitch
sl st
A small stitch used for joining
Stitch
st
One crochet stitch
Round
rnd
One complete circle of stitches
Repeat
rep
Repeat the instructions
Fasten off
FO
Finish the last stitch and cut the yarn
How to Make a Single Crochet
The single crochet is the main stitch used in this pattern.
- Insert your hook into the next stitch.
- Yarn over and pull up a loop.
- You now have two loops on your hook.
- Yarn over again.
- Pull through both loops.
You have made one single crochet!
How to Make a Crochet Increase
An increase makes your crochet piece wider.
Insert your hook into the next stitch.
Work two single crochet stitches into that same stitch.
You have made one increase.
Increases help shape the bear’s head, tummy, and feet.
How to Make an Invisible Decrease
An invisible decrease makes two stitches become one.
- Insert your hook through the front loop of the next stitch.
- Without pulling up yarn, insert your hook through the front loop of the following stitch.
- Yarn over and pull through both front loops.
- Yarn over again.
- Pull through the two loops remaining on your hook.
You have made one invisible decrease.
This technique helps the fabric look smooth and reduces noticeable gaps.
Choosing the Best Yarn for Your Crochet Teddy Bear
The yarn you choose can change how your finished bear looks and feels.
For a small amigurumi toy, smooth cotton or cotton-blend yarn is a good choice.
It helps create clear stitches and makes counting easier.
Soft acrylic yarn can also work well.
Try to choose yarn that is comfortable to hold and not too fuzzy.
Very fluffy yarn can make small stitches harder to find.
Beautiful Crochet Teddy Bear Color Ideas
Color Combination
Style
Classic Beige
Traditional teddy bear
Warm Brown
Cozy and timeless
Cream and White
Soft and simple
Pastel Pink
Sweet and playful
Baby Blue
Gentle pastel style
Light Gray
Modern and minimal
Caramel and Cream
Warm handmade look
Lavender
Cute and whimsical
For your first amigurumi bear, try a light solid color.
It will be easier to see the stitches while you crochet.
Important Crochet Bear Pattern Notes
Before starting, remember these simple instructions.
- Work in continuous rounds unless stated otherwise.
- Do not join each round with a slip stitch.
- Use a stitch marker to mark the first stitch of every round.
- Move the marker after completing each round.
- Count your stitches before starting the next round.
- Use invisible decreases where the pattern says dec.
- Stuff the bear gradually instead of adding all the stuffing at once.
- Sew the smaller parts securely.
- The head and body are made as one continuous piece.
The following is a standalone small-bear variation, not a stitch-for-stitch transcription of Medintseva toys’ video.
How to Crochet a Bear Step by Step
Now it is time to make your cute little teddy!
We will start with the head, continue into the body, then make the arms, legs, and ears.
Finally, we will embroider the face and sew the parts together.
Step 1: Start the Bear’s Head
Take your main-color yarn and crochet hook.
Make a magic ring.
Round 1: Work 6 single crochet stitches into the magic ring. (6)
Pull the ring closed.
Place a stitch marker in the first stitch.
Round 2: Work an increase in every stitch. (12)
Round 3: Work 1 sc, then 1 increase. Repeat six times. (18)
Round 4: Work 2 sc, then 1 increase. Repeat six times. (24)
Round 5: Work 3 sc, then 1 increase. Repeat six times. (30)
Round 6: Work 4 sc, then 1 increase. Repeat six times. (36)
Your crochet circle will now begin to look like the top of a rounded head.
Step 2: Build the Round Head
Now we will add height to the head.
Rounds 7–11
Work one single crochet into each stitch around.
Each round should have 36 stitches.
Keep the stitches firm and even.
You will see the head begin to curve into a rounded shape.
Step 3: Shape the Lower Head
Now we will begin decreasing.
Round 12: Work 4 sc, then 1 decrease. Repeat six times. (30)
Round 13: Work 3 sc, then 1 decrease. Repeat six times. (24)
Before the opening becomes too small, check the face area.
You can embroider the eyes now or after assembly.
Add some polyester stuffing to the head.
Round 14: Work 2 sc, then 1 decrease. Repeat six times. (18)
Round 15: Work 1 sc, then 1 decrease. Repeat six times. (12)
The opening is now narrow enough to form the neck area.
Make sure the head is evenly stuffed.
Do not fasten off.
We will continue directly into the body.
Crochet Bear Head: Round-by-Round Table
Round
Instructions
Stitch Count
1
6 sc in MR
6
2
inc × 6
12
3
(1 sc, inc) × 6
18
4
(2 sc, inc) × 6
24
5
(3 sc, inc) × 6
30
6
(4 sc, inc) × 6
36
7–11
sc around
36 each
12
(4 sc, dec) × 6
30
13
(3 sc, dec) × 6
24
14
(2 sc, dec) × 6
18
15
(1 sc, dec) × 6
12
Your little bear now has a rounded head.
How to Crochet the Bear’s Body
The body is made directly below the head.
This keeps the main teddy shape in one piece.
Step 4: Begin the Body
Keep working with the same yarn.
Round 16: Work 1 sc, then 1 increase. Repeat six times. (18)
Round 17: Work 2 sc, then 1 increase. Repeat six times. (24)
Round 18: Work 3 sc, then 1 increase. Repeat six times. (30)
These increases make the body wider than the neck.
You will now see the small teddy tummy taking shape.
Step 5: Make the Round Tummy
Rounds 19–23
Work one single crochet in every stitch around.
Each round should have 30 stitches.
Keep your tension even.
The bear will now have a simple, chubby body.
Step 6: Shape and Close the Bottom
Now we will make the lower body smaller.
Round 24: Work 3 sc, then 1 decrease. Repeat six times. (24)
Round 25: Work 2 sc, then 1 decrease. Repeat six times. (18)
Start adding stuffing to the body.
Spread the fiberfill evenly into the tummy.
Round 26: Work 1 sc, then 1 decrease. Repeat six times. (12)
Add a little more stuffing if needed.
Round 27: Work six decreases. (6)
Fasten off, leaving a yarn tail.
Thread the tail through the front loops of the remaining six stitches.
Pull gently to close the opening.
Weave in the yarn end securely.
Your bear’s head and body are complete!
Crochet Bear Body: Round-by-Round Table
Round
Instructions
Stitch Count
16
(1 sc, inc) × 6
18
17
(2 sc, inc) × 6
24
18
(3 sc, inc) × 6
30
19–23
sc around
30 each
24
(3 sc, dec) × 6
24
25
(2 sc, dec) × 6
18
26
(1 sc, dec) × 6
12
27
dec × 6
6
How to Crochet the Teddy Bear Arms
Now we will make two little arms.
Use the same yarn color as the body.
Step 7: Make the First Arm
Start with a magic ring.
Round 1: Work 6 sc in the magic ring. (6)
Rounds 2–6: Work one sc into each stitch around. (6)
Fasten off, leaving a long yarn tail.
You now have a small crochet tube.
You can add a tiny amount of stuffing to the lower part if you want a fuller arm.
Leave the upper part soft so it is easier to sew.
Step 8: Make the Second Arm
Repeat the same instructions to make another arm.
Try to keep both arms the same size.
Crochet Bear Arms: Round Table
Round
Instructions
Stitch Count
1
6 sc in MR
6
2–6
sc around
6 each
Make two identical arms.
How to Crochet the Teddy Bear Legs
Next, we will make two little legs.
The legs are slightly wider than the arms.
Step 9: Make the First Leg
Start with a magic ring.
Round 1: Work 6 single crochet stitches into the ring. (6)
Round 2: Work 1 sc, then 1 increase. Repeat three times. (9)
Rounds 3–5: Work one sc into each stitch around. (9)
Round 6: Work 1 sc, then 1 decrease. Repeat three times. (6)
Add a small amount of stuffing.
Fasten off, leaving a long tail for sewing.
Step 10: Make the Second Leg
Repeat the same instructions.
Make sure both legs are the same size.
Crochet Bear Legs: Round Table
Round
Instructions
Stitch Count
1
6 sc in MR
6
2
(1 sc, inc) × 3
9
3–5
sc around
9 each
6
(1 sc, dec) × 3
6
You now have two little teddy bear legs.
How to Crochet the Bear Ears
A teddy bear needs two cute round ears!
These ears are made with a small crochet circle that is folded slightly.
Step 11: Make the First Ear
Start with a magic ring.
Round 1: Work 6 single crochet stitches into the ring. (6)
Round 2: Work two single crochet stitches into every stitch. (12)
Round 3: Work one single crochet into each stitch. (12)
Fasten off, leaving a long yarn tail.
Flatten the small circle gently.
Do not add stuffing.
Step 12: Make the Second Ear
Repeat the same instructions.
You should now have two matching ears.
Crochet Bear Ears: Round Table
Round
Instructions
Stitch Count
1
6 sc in MR
6
2
inc × 6
12
3
sc around
12
Flatten each ear and sew the open edges together through matching stitches if needed.
How to Make a Cute Teddy Bear Face
Now comes one of the sweetest parts of the project!
We will add two little eyes, a nose, and a mouth.
Step 13: Embroider the Eyes
Take a piece of black embroidery yarn.
Thread it onto a tapestry needle.
Place two small eyes on the front of the head.
For this version, try placing them between Head Rounds 8 and 9, with roughly six stitches between the eye positions.
Use a few small stitches to create each eye.
Keep the eyes even.
Secure the ends carefully inside the head or along the back of the stitches.
Step 14: Add a Little Nose
Use black or dark brown yarn.
Find the center of the face, just below the eyes.
Embroider a small triangular nose.
Then make one short vertical stitch beneath it.
Add a tiny curved mouth if you like.
You can also use pink yarn to add small rosy cheeks.
Your teddy bear now has a sweet little expression.
How to Assemble the Crochet Bear
Now we will sew the arms, legs, and ears onto the body.
Take your time with this step.
A little careful sewing can make the finished bear look beautiful.
Step 15: Attach the Ears
Place the two ears near the top sides of the head.
Use pins to hold them in place temporarily.
Look at the bear from the front.
Check that both ears are even.
Use your tapestry needle and yarn tails to sew them firmly to the head.
Weave the ends inside the stitches.
Step 16: Attach the Arms
Place one arm on each side of the upper body.
Position them just below the neck.
Use pins to check that they are level.
Flatten the top opening of each arm.
Sew each arm firmly to the body using several small stitches.
Check that the arms do not pull away easily.
Step 17: Attach the Legs
Place the two legs near the lower front of the body.
You can angle them slightly forward to help the bear look as if it is sitting.
Pin them in place.
Check that the legs are evenly positioned.
Sew each leg firmly to the body.
Weave in the ends.
Step 18: Check Your Finished Bear
Place your teddy on a table.
Look at the face and ears.
Check that the arms and legs are even.
Gently shape the head and tummy with your hands.
Make sure the embroidered details and sewn pieces are secure.
Your cute little crochet bear is finished!
Complete One Hour Crochet Bear Pattern Summary
Use this table when you want a quick reminder of the pattern.
Part
Instructions
Head
Rounds 1–15, increase to 36 sc, then decrease to 12
Body
Rounds 16–27, increase to 30 sc, then close
Arms
2 pieces, 6 rounds each
Legs
2 pieces, 6 rounds each
Ears
2 pieces, 3 rounds each
Eyes
Embroider with black yarn
Nose and Mouth
Embroider with dark yarn
Assembly
Sew ears, arms, and legs securely
Finishing
Hide ends and shape the bear
Watch the One Hour Crochet Bear Tutorial
Medintseva toys has a video called How to Crochet a Bear ONE HOUR 6” – Step by Step Tutorial.
The creator demonstrates the techniques used to make a small teddy bear, including crochet shaping and assembling the pieces.
The video shows a bear approximately 6 inches tall and can be a helpful reference for practicing amigurumi.
creator: Medintseva toys.
The written pattern on this page is a separate small-bear variation, so its exact rounds and assembly may differ from those shown in the video.
Helpful Amigurumi Tips for Beginners
Making small stuffed crochet toys can be easier when you take your time.
Here are some useful tips.
Tip
Advice
Use a stitch marker
Mark the beginning of each round
Count carefully
Check every stitch count
Keep even tension
Prevent gaps between stitches
Choose a suitable hook
Use a hook that creates a firm fabric
Use invisible decreases
Help keep the surface smooth
Add stuffing gradually
Keep the head and body evenly shaped
Pin pieces before sewing
Check that the limbs and ears are balanced
Secure yarn ends
Help prevent the bear from unraveling
Why Is My Crochet Bear Head Uneven?
You may have missed an increase or decrease.
Count your stitches at the end of each round.
Use the head table to check your totals.
Why Can I See the Stuffing?
Your stitches may be too loose.
Try a slightly smaller crochet hook or a firmer tension.
Do not overstuff the bear.
Why Is My Teddy Bear Lumpy?
The stuffing may not be spread evenly.
Use small pieces of polyester fiberfill and gently arrange them inside the head and tummy.
Why Are My Arms Different Sizes?
You may have worked an extra round on one arm.
Count the rounds and compare both pieces before sewing.
How Can I Make My Bear Look More Symmetrical?
Pin the ears and limbs in place first.
Look at the teddy from the front and both sides.
Adjust the positions before sewing.
Creative Ways to Customize Your Crochet Bear
One of the best things about crochet is making every project your own.
Here are some cute ideas.
Make a Pink Teddy Bear
Use soft pink yarn for the head, body, ears, and limbs.
Add a little cream muzzle if you want extra contrast.
Make a Classic Brown Bear
Choose caramel or chocolate-brown yarn.
Use dark brown embroidery yarn for the nose and mouth.
Add a Tiny Crochet Scarf
Make a short chain.
Work a few rows of single crochet to create a small scarf.
Wrap it loosely around the bear’s neck as a removable decoration for adult display.
Do not use loose scarves, strings, or ribbons on toys intended for infants or very young children.
Make a Little Bear Family
Use different yarn weights or colors to create a collection of small bears.
Adjust the hook size to match each yarn.
Embroider a Sleepy Face
Instead of round eyes, make two small curved stitches.
This gives your bear a peaceful sleeping expression.
Make a Holiday Bear
Choose festive colors and add a small decorative accessory.
You can make a cute Christmas bear, birthday bear, or winter-themed teddy.
Fun Ways to Display Your Crochet Teddy Bear
A handmade teddy can brighten up many spaces.
- Bookshelf: Place the bear next to your favorite books.
- Desk: Add it beside a notebook or pencil holder.
- Craft room: Display it with other handmade crochet projects.
- Gift basket: Include it in a thoughtful handmade gift for an older recipient.
- Nursery shelf: Use it as a decorative piece kept out of an infant’s reach.
- Seasonal display: Create a little group of colorful bears.
For infants, always keep stuffed toys out of cribs and other sleep spaces.
If making toys for young children, use age-appropriate materials and avoid small detachable parts.
Other Crochet Projects Using Amigurumi Techniques
Once you learn the magic ring, increases, and decreases, you can make many other cute projects.
Crochet Bunny
Use the same round shaping techniques to create a little bunny with long ears.
Crochet Cat
Make a small cat with pointed ears and a curved tail.
Crochet Puppy
Create a puppy with floppy ears and a rounded face.
Crochet Mini Keychains
Use small circles and simple shaping to make cute charms for bags and keys.
Crochet Holiday Ornaments
Try making small festive characters using different yarn colors.
These projects are great ways to practice your new amigurumi skills.
How to Care for Your Crochet Bear
A handmade crochet bear needs gentle care to stay soft and neat.
Care Step
What to Do
Cleaning
Follow the yarn care label and spot clean when possible
Washing
Use a suitable gentle method for the yarn and stuffing
Drying
Press gently with a towel and dry thoroughly
Reshaping
Arrange the head and limbs while slightly damp
Storage
Keep in a dry, clean place
Loose stitches
Repair any damaged seams before further use
Facial details
Check that embroidered features remain secure
Make sure the inside of the bear dries completely after washing.
Avoid high heat unless the yarn and stuffing labels allow it.
Frequently Asked Questions
Is this one hour crochet bear good for beginners?
Yes, for beginners who know basic single crochet, increases, and decreases. A first-time crocheter may need longer than one hour.
How long does it take to crochet a small teddy bear?
It depends on your experience, yarn, and crochet speed. Experienced crocheters may finish a simple little bear quickly, while beginners may need several sessions.
What yarn is best for amigurumi bears?
Smooth cotton, cotton-blend, or acrylic yarn is a good choice. Choose a yarn that makes firm stitches and feels comfortable to work with.
What crochet hook size should I use?
For some DK and worsted-weight yarns, a 2.5–3.5 mm hook can create dense amigurumi fabric. Make a small sample and choose a hook that suits your yarn.
What crochet stitches are used?
This pattern uses single crochet, increases, invisible decreases, and a magic ring.
Why are amigurumi toys worked in continuous rounds?
Continuous rounds create a smooth fabric without the raised joins that can appear when joining every round.
Can I make the teddy bear larger?
Yes. You can use thicker yarn and a suitable larger crochet hook. The finished size will change, but the same stitch counts can be used for this variation.
Can I make the bear smaller?
Yes. Use finer yarn and a smaller hook. Be careful because tiny stitches can be harder to crochet and assemble.
How do I stop stuffing from showing through?
Use a suitable small hook, keep your stitches even, and avoid adding too much stuffing.
Are plastic safety eyes suitable for babies?
Small plastic parts can become choking hazards if detached. Embroidered facial features avoid this type of detachable plastic component, but the finished toy still needs appropriate safety assessment before being given to a young child.
Can I put a crochet bear in a baby’s crib?
No. Keep stuffed animals and other soft toys out of infant sleep spaces.
Can I sell handmade crochet teddy bears?
Rules for selling handmade toys depend on where you sell them. If the bear is intended for children, check the applicable toy-safety requirements before offering it for sale.
Where can I watch the original crochet bear video?
Watch Medintseva toys’ original one-hour crochet bear tutorial linked above.
Final Thoughts
This one hour crochet bear is a lovely way to practice amigurumi and make something cute with your own hands.
The round head, little tummy, and soft ears give the bear a classic handmade look.
With just a few basic crochet stitches, you can create a sweet teddy for your desk, bookshelf, or gift collection.
Try soft beige for a traditional look, warm brown for a cozy teddy, or pastel pink for something playful.
Take your time, count your stitches, and enjoy seeing your bear come together.
Once you finish your first little teddy, you can make more in different colors and sizes.
For more easy crochet patterns, small amigurumi projects, and handmade gift ideas, explore USESEW.com.
Happy crocheting!