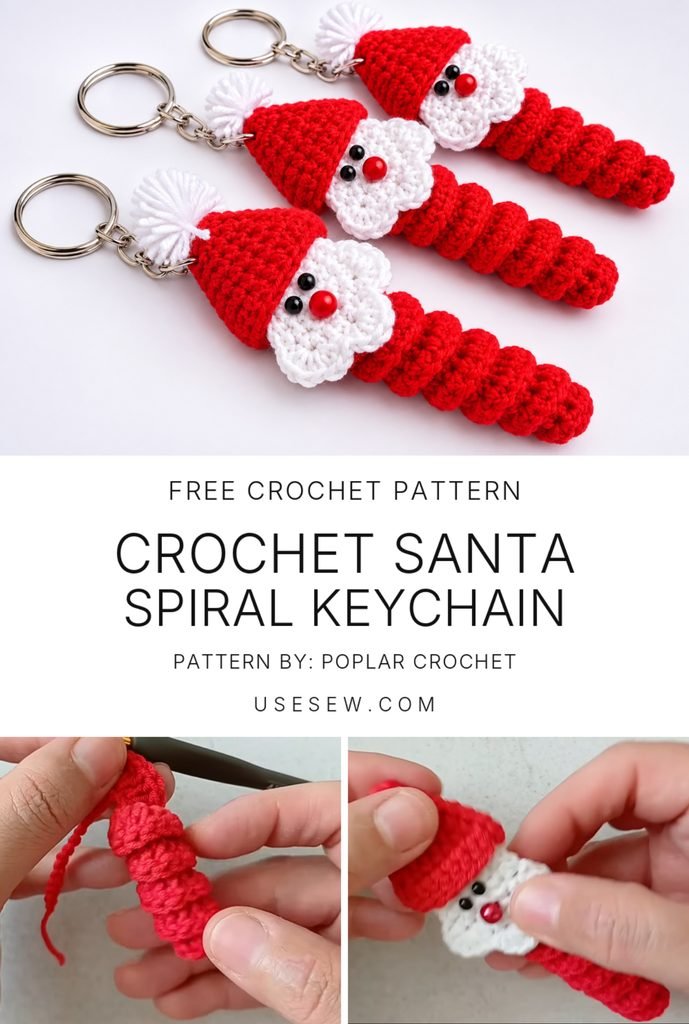
This crochet Santa spiral keychain is a fun little project that brings handmade holiday charm to your keys, bag, or Christmas tree.
With just a small amount of red and white yarn, a 2.5 mm crochet hook, and a few basic stitches, you can create an adorable Santa decoration.
The best part? You do not need lots of yarn or expensive tools.
The curly body is made by working several double crochet stitches into each foundation chain. The extra stitches make the yarn twist into a beautiful spiral.
Then you add a little face, a fluffy white beard, and a classic Santa hat.
This Christmas crochet pattern is perfect for using leftover yarn and making thoughtful handmade gifts.
In this step-by-step guide, you will learn how to crochet the spiral body, shape Santa’s face and beard, make the hat, and attach a keyring.
You will also find a simple stitch guide, round-by-round tables, helpful crochet tips, and answers to common questions.
So, grab your yarn and let’s make something festive!
What Is a Crochet Santa Spiral Keychain?
A crochet Santa spiral keychain is a small handmade Christmas decoration shaped like Santa Claus.
Unlike a traditional stuffed crochet doll, this Santa has a long, curly body made with a simple crochet spiral.
The spiral hangs below a small face with a white beard, embroidered eyes, a little nose, and a red Santa hat.
You can attach a keyring to turn it into a bag charm, or add a hanging loop to make a Christmas ornament.
The spiral is created by working multiple double crochet stitches into every chain of a foundation row.
As the number of stitches grows, the fabric naturally curls.
The result is a sweet holiday accessory with a fun, playful shape.
This version takes inspiration from Poplar Crochet’s Santa spiral keychain tutorial and uses a separately crocheted face, beard, and hat.
Why You Will Love This Crochet Santa Spiral Keychain
There are so many reasons to try this cute Christmas project.
- Beginner-friendly stitches: Practice chain, single crochet, double crochet, and slip stitch.
- Beautiful spiral shape: Learn how crochet increases create a curly effect.
- Small yarn project: Use leftover red, white, and cream yarn.
- Cute Christmas decoration: Hang Santa on a bag, set of keys, or Christmas tree.
- Handmade gift idea: Make one for friends, family, or other crochet lovers.
- Easy to customize: Change the colors or make the spiral longer.
- Useful new skills: Practice simple rounds, increases, and sewing small crochet pieces together.
- Fun holiday project: Enjoy making something cheerful for the Christmas season.
You can make one Santa in traditional Christmas colors or create several in different styles.
Crochet Santa Spiral Keychain: Project Details
Here is a quick look at the pattern before you begin.
| Project Detail | Information |
|---|---|
| Pattern name | Crochet Santa Spiral Keychain |
| Skill level | Confident beginner |
| Crochet terminology | US terms |
| Crochet hook | 2.5 mm |
| Yarn | Smooth acrylic or cotton-blend yarn |
| Main colors | Red, white, and light peach |
| Main stitches | Chain, slip stitch, single crochet, double crochet |
| Spiral foundation | Chain 30 |
| Spiral stitches | 116 double crochet stitches |
| Face | 2 joined rounds |
| Hat | 11 rounds |
| Construction | Separate spiral, face, beard, and hat |
| Finished size | Depends on yarn and tension |
| Best for | Christmas gifts, ornaments, and bag charms |
The small pieces are simple to crochet, but sewing them together takes a little patience.
Materials Needed
Before starting, gather your yarn and tools.
You do not need many supplies for this project.
| Material | Details |
|---|---|
| Red yarn | For the spiral body and Santa hat |
| White yarn | For the fluffy beard, hat brim, and pom-pom |
| Light peach yarn | For Santa’s face |
| Black embroidery yarn | For two little eyes |
| Pink or red yarn | For the nose |
| Crochet hook | 2.5 mm |
| Keyring or lobster clasp | One small metal keychain attachment |
| Tapestry needle | For sewing pieces and hiding yarn ends |
| Scissors | For cutting yarn |
| Stitch marker | Optional, to mark the beginning of hat rounds |
Helpful Yarn Tip
Smooth acrylic yarn works well because the stitches are easy to see.
Cotton-blend yarn is another good choice.
Try to use yarn of the same weight for all parts of Santa.
For a small keychain, embroidered eyes are a better choice than loose beads because they stay attached more securely.
Beginner Crochet Stitch Guide
This crochet Santa keychain uses a few basic crochet stitches.
All instructions use US crochet terms.
| Stitch | Abbreviation | Meaning |
|---|---|---|
| Chain | ch | Pull yarn through the loop on your hook |
| Slip stitch | sl st | A short stitch used for joining |
| Single crochet | sc | A small, firm crochet stitch |
| Double crochet | dc | A taller stitch made with a yarn over |
| Increase | inc | Work two stitches into the same stitch |
| Magic ring | MR | An adjustable loop used to begin crochet rounds |
| Stitch | st | One crochet stitch |
| Round | rnd | A complete circle of crochet |
| Row | row | A line of crochet stitches |
| Fasten off | FO | Secure the final loop and cut the yarn |
How to Make a Double Crochet
The double crochet is the main stitch used for the curly Santa body.
- Wrap the yarn over your hook.
- Insert the hook into the next stitch.
- Yarn over and pull up a loop.
- You should have three loops on your hook.
- Yarn over and pull through two loops.
- Yarn over again and pull through the last two loops.
You have made one double crochet!
How to Make a Single Crochet
Single crochet is used for the beard and Santa hat.
- Insert your hook into the next stitch.
- Yarn over and pull up a loop.
- You now have two loops on your hook.
- Yarn over and pull through both loops.
You have made one single crochet.
How to Make a Crochet Increase
An increase makes your crochet piece wider.
To make a single crochet increase, work two single crochet stitches into the same stitch.
To make a double crochet increase, work two double crochet stitches into the same stitch.
Increases are important for shaping Santa’s face, beard, and hat.
Choosing the Best Yarn and Colors
The yarn you choose can change how your Santa looks.
For a traditional Christmas Santa, bright red and white are perfect.
Smooth acrylic yarn is easy to find and available in many beautiful colors.
Cotton-blend yarn can also create a neat, structured finish.
Avoid very fluffy yarn for your first project because it can be difficult to see the small stitches.
Beautiful Santa Color Ideas
| Color Combination | Style |
|---|---|
| Classic Red and White | Traditional Christmas Santa |
| Pink and Cream | Sweet pastel Christmas |
| Burgundy and Ivory | Cozy vintage style |
| Green and White | Playful holiday elf |
| Navy and Silver | Modern winter style |
| Red and Beige | Warm handmade Christmas look |
For your first Santa, try classic red, white, and light peach.
These colors make the different parts easy to recognize.
Crochet Santa Spiral Keychain Pattern Notes
Before you start, remember these simple rules.
- The spiral is crocheted along a foundation chain.
- Four double crochet stitches are worked into each working chain.
- The extra stitches make the spiral curl naturally.
- The face and hat are made separately.
- The face uses joined double crochet rounds.
- The hat is made with single crochet rounds.
- The beard is attached to the lower part of the face.
- Keep your tension even.
- Use a yarn needle to sew everything together securely.
For the hat, place a stitch marker in the first stitch of each round and work in a continuous spiral.
For the face, join each round with a slip stitch.
How to Crochet a Santa Spiral Keychain
Now it is time to make your little Santa!
We will crochet the spiral first, then make the face, beard, and hat.
Finally, we will attach the pieces and add the keyring.
Step 1: Crochet the Red Spiral Body
Start with red yarn and a 2.5 mm crochet hook.
Make a slip knot.
Chain 30.
Try to keep your foundation chain even and not too tight.
Now turn your work.
Insert your hook into the second chain from the hook.
Work four double crochet stitches into that chain.
Move to the next chain.
Work another four double crochet stitches.
Continue making four double crochet stitches into each remaining foundation chain.
As you work, the crochet strip will begin to twist.
This is exactly what we want!
The extra stitches create a beautiful curly shape.
When you reach the end of the foundation chain, fasten off.
Leave a long yarn tail for sewing.
Gently arrange the spiral with your fingers.
Stitch count: You worked into 29 chains, making 116 double crochet stitches.
Your curly red Santa body is ready!
Step 2: Crochet Santa’s Face
Now we will make Santa’s little round face.
Use light peach or cream yarn.
Start with a magic ring.
Round 1
Chain 3. This counts as the first double crochet.
Work 11 more double crochet stitches into the magic ring.
Pull the ring closed.
Join with a slip stitch to the top of the starting chain 3.
You should have 12 double crochet stitches.
Round 2
Chain 3. This counts as the first double crochet of the round.
Work one more double crochet into the same stitch.
Now work two double crochet stitches into each remaining stitch.
Join with a slip stitch.
You should have 24 double crochet stitches.
Fasten off, leaving a long yarn tail.
You now have a small round face for Santa.
Santa Face Round Table
| Round | Instructions | Stitch Count |
|---|---|---|
| 1 | Ch 3 and 11 dc in MR | 12 dc |
| 2 | 2 dc in each stitch, counting the starting ch 3 as the first dc | 24 dc |
Gently flatten the face with your fingers before adding the beard.
Step 3: Make the Fluffy White Beard
Santa needs a lovely white beard!
Take your white yarn.
Place the face flat on the table with the right side facing you.
Find 12 consecutive stitches across the lower half of the outer round.
Attach the white yarn to the first of these stitches.
Beard Row 1
Work two single crochet stitches into each of the 12 marked stitches.
You should have 24 single crochet stitches.
Chain 1 and turn.
Beard Row 2
Work one single crochet into the first stitch.
Then work two single crochet stitches into the next stitch.
Repeat this pattern across the row.
You should have 36 single crochet stitches.
Fasten off, leaving a yarn tail.
The extra stitches make the beard wider and slightly ruffled.
Gently spread the white crochet fabric around the lower part of Santa’s face.
Now Santa has a fluffy white beard!
Santa Beard Stitch Table
| Row | Instructions | Stitch Count |
|---|---|---|
| 1 | 2 sc in each of 12 face stitches | 24 sc |
| 2 | (1 sc, inc) × 12 | 36 sc |
Step 4: Add Santa’s Eyes and Nose
Now we will give Santa a sweet little face.
Take a small piece of black embroidery yarn.
Thread it onto your tapestry needle.
Embroider two small black eyes on the upper part of the face.
Try to keep them even.
Next, use a little red or pink yarn for the nose.
Make one or two small stitches between the eyes and beard.
You can also embroider a tiny smile.
Secure all yarn ends on the back of the face.
Your Santa is starting to look adorable!
Step 5: Crochet Santa’s Red Hat
The Santa hat is made from the pointed tip down to the white brim.
Use red yarn and a 2.5 mm crochet hook.
Start with a magic ring.
Round 1: Work 6 single crochet stitches into the magic ring. (6)
Round 2: Work one single crochet into each stitch. (6)
Round 3: Work one single crochet, then one increase. Repeat three times. (9)
Round 4: Work one single crochet into each stitch. (9)
Round 5: Work two single crochet stitches, then one increase. Repeat three times. (12)
Round 6: Work one single crochet into each stitch. (12)
Round 7: Work three single crochet stitches, then one increase. Repeat three times. (15)
Round 8: Work four single crochet stitches, then one increase. Repeat three times. (18)
Round 9: Work five single crochet stitches, then one increase. Repeat three times. (21)
Round 10: Work six single crochet stitches, then one increase. Repeat three times. (24)
Round 11: Change to white yarn. Work one single crochet into every stitch. (24)
Fasten off, leaving a long tail for sewing.
You now have a little red Santa hat with a white brim.
Santa Hat Round-by-Round Table
| Round | Instructions | Total Stitches |
|---|---|---|
| 1 | 6 sc in magic ring | 6 |
| 2 | sc around | 6 |
| 3 | (1 sc, inc) × 3 | 9 |
| 4 | sc around | 9 |
| 5 | (2 sc, inc) × 3 | 12 |
| 6 | sc around | 12 |
| 7 | (3 sc, inc) × 3 | 15 |
| 8 | (4 sc, inc) × 3 | 18 |
| 9 | (5 sc, inc) × 3 | 21 |
| 10 | (6 sc, inc) × 3 | 24 |
| 11 | White yarn, sc around | 24 |
Gently bend the pointed tip to one side for a cute Christmas look.
Step 6: Make a Small White Pom-Pom
A tiny white pom-pom makes the Santa hat extra festive.
Cut a short piece of white yarn and set it aside.
Wrap another length of white yarn around two fingers several times.
Carefully remove the yarn loops.
Tie the short yarn piece tightly around the middle.
Cut the loops on both sides.
Trim the ends until the pom-pom looks small and round.
Use the tying ends to sew it firmly to the pointed tip of the hat.
Your Santa hat is complete!
Step 7: Assemble the Crochet Santa
Now it is time to join all the pieces.
Place Santa’s face on a flat surface.
Position the red hat over the upper part of the face.
The white brim should cover the top edge without hiding the eyes.
Use your tapestry needle to sew the hat securely to the face.
Make small, neat stitches.
Next, place one end of the red crochet spiral behind the lower part of the face.
The spiral should hang downward beneath the beard.
Sew the spiral firmly to the back of the face using the long yarn tail.
Pass through several strong stitches.
Do not attach the spiral with only one loose stitch.
Turn Santa over and check that all pieces are secure.
Weave in the remaining yarn ends.
Step 8: Attach the Keyring
Your little Santa is almost finished!
Take a small metal keyring or lobster clasp.
Place it at the upper back of Santa’s head, near the hat attachment.
Use strong matching yarn or thread to sew the ring firmly through the hat and face connection.
Pass through several stitches to make the attachment stronger.
Do not attach the keyring only to the pom-pom.
Gently pull the ring to check that it is secure.
Your crochet Santa spiral keychain is finished!
Easy Crochet Santa Keychain Pattern Summary
Use this table as a quick guide while you crochet.
| Step | Instructions | Helpful Tip |
|---|---|---|
| Spiral Body | Ch 30, work 4 dc into each of 29 chains | Allow the spiral to curl |
| Face Round 1 | 12 dc in magic ring | Pull the ring closed |
| Face Round 2 | Increase to 24 dc | Keep the face flat |
| Beard Row 1 | 2 sc in each of 12 stitches | 24 stitches total |
| Beard Row 2 | (1 sc, inc) × 12 | 36 stitches total |
| Eyes and Nose | Embroider small facial features | Keep stitches secure |
| Santa Hat | Work 11 rounds | Use a stitch marker |
| Pom-Pom | Make a small white yarn pom-pom | Sew it firmly |
| Assembly | Attach hat, face, and spiral | Hide loose ends |
| Keyring | Sew metal hardware to the upper back | Test the attachment |
Watch the Original Crochet Santa Keychain Tutorial
credit: Poplar Crochet.
Helpful Crochet Tips for Beginners
Small crochet projects can be easier when you take your time.
Here are some tips to help you.
| Tip | Advice |
|---|---|
| Keep even tension | Make your stitches firm but comfortable |
| Count your stitches | Check each round before moving on |
| Use a stitch marker | Mark the beginning of the Santa hat rounds |
| Let the spiral curl | Do not pull it straight while crocheting |
| Choose smooth yarn | Small stitches are easier to see |
| Sew the face securely | Pass through several crochet stitches |
| Embroider the details | Avoid loose decorative beads |
| Check the keyring | Make sure the attachment is strong |
Why Is My Crochet Spiral Not Curling?
The spiral curls because four double crochet stitches are worked into every foundation chain.
Check that you are making the correct number of stitches.
If you accidentally work only one or two stitches into each chain, the spiral may not curl as much.
Why Is My Santa Hat Too Wide?
You may have added extra increases.
Check your stitch count at the end of every round.
If the hat is wider than expected, undo the last round and try again.
What If My Santa Beard Looks Flat?
Gently spread the white stitches with your fingers.
The increases should create a soft, ruffled edge.
If the fabric still looks too tight, check your stitch count.
What If My Yarn Keeps Splitting?
Try working more slowly.
Make sure your hook catches the entire yarn strand.
You can also switch to a smoother yarn.
Creative Ways to Customize Your Crochet Santa
One of the best things about crochet is making something in your own style.
Here are some fun ideas.
Make a Pastel Santa
Use soft pink yarn for the body and hat.
Add a cream beard and a little pink nose.
This creates a sweet pastel Christmas charm.
Make a Green Holiday Elf
Try green yarn for the spiral and hat.
Use cream yarn for the face and a red pom-pom for the hat.
Make a Shorter Spiral
Start with 20 chains instead of 30.
Continue working four double crochet stitches into each working chain.
This makes a shorter curly body.
Make a Longer Spiral
Start with 40 chains.
Work the same four-double-crochet pattern across.
The longer spiral creates a playful hanging decoration.
Add a Small Bell
You can attach a tiny decorative bell near the end of the spiral.
Make sure it is attached securely.
Small bells and loose decorations can be choking hazards, so this version should not be used as a toy for babies or toddlers.
Try Different Christmas Colors
Use burgundy, navy, forest green, or another favorite winter color.
Keep the beard white or cream for a classic Santa look.
Fun Ways to Use Your Crochet Santa Keychain
This little Santa is more than a keychain.
You can use it in many creative ways.
- Bag charm: Clip it to your favorite handbag.
- Christmas ornament: Add a hanging loop for the Christmas tree.
- Handmade gift: Make one for a friend or family member.
- Stocking decoration: Attach it to a Christmas stocking.
- Gift topper: Tie it to a wrapped holiday present.
- Zipper charm: Add it to a crochet pouch or backpack.
- Holiday display: Hang several Santa spirals together.
You can also make a collection of little Christmas characters in different colors.
More Cute Crochet and Christmas Craft Ideas
Love making small handmade accessories?
Try our Easy Crochet Mini Dress Keychain for another cute project that uses simple stitches and a small amount of yarn.
You might also enjoy our Crochet Monster Key Holder, a fun little accessory for keeping your keys together.
If you enjoy Christmas crafts, explore our Easy Origami Christmas Bells tutorial for another handmade holiday decoration.
These projects are lovely for making gifts and decorating your home.
How to Care for Your Crochet Santa Keychain
A little care can keep your handmade Santa looking neat.
| Care Step | What to Do |
|---|---|
| Cleaning | Gently spot clean with a damp cloth |
| Soap | Use a little mild detergent if needed |
| Drying | Lay flat and let it air dry |
| Handling | Avoid pulling hard on the spiral or hat |
| Storage | Keep in a clean, dry box |
| Shape | Gently arrange the spiral after cleaning |
| Hardware | Check the keyring attachment regularly |
Avoid soaking the keychain if the metal hardware may rust.
Do not twist or wring the crochet pieces while wet.
Always follow the washing instructions on your yarn label.
Frequently Asked Questions
Is this crochet Santa spiral keychain good for beginners?
Yes, especially for beginners who already know chain, single crochet, and double crochet stitches. The small pieces and assembly may take a little extra practice.
What yarn is best for a crochet Santa keychain?
Smooth acrylic or cotton-blend yarn is a good choice. Try to use the same yarn weight for all the pieces.
What crochet hook size should I use?
This pattern uses a 2.5 mm crochet hook. You can adjust the hook size to match your yarn and tension.
How many chains do I need for the Santa spiral?
Start with 30 chains. Work four double crochet stitches into each chain, beginning with the second chain from the hook.
Why does the crochet spiral curl?
The spiral curls because many double crochet stitches are worked into each foundation chain. The extra fabric naturally twists into a curly shape.
Can I make the Santa keychain bigger?
Yes. You can use thicker yarn, a larger crochet hook, or a longer foundation chain.
You may also need to adjust the face and hat sizes.
Can I use embroidery instead of beads?
Yes! Embroidered eyes and a nose are a good choice for small crochet ornaments.
Can I turn the Santa keychain into a Christmas ornament?
Yes. Add a yarn hanging loop instead of a metal keyring.
How long does this Christmas crochet project take?
The time depends on your crochet experience. Experienced crocheters may finish it in one sitting, while beginners may need more time.
Can I use leftover yarn?
Yes! This is a lovely project for using small amounts of red, white, and cream yarn.
How do I attach the keyring securely?
Sew the keyring through several strong stitches near the upper back of the head.
Do not attach it only to the pom-pom.
Where can I watch the original crochet tutorial?
You can watch the original Santa spiral keychain video by Poplar Crochet using the YouTube link above.
Final Thoughts
This crochet Santa spiral keychain is a sweet way to add handmade magic to the Christmas season.
The curly red body makes the design playful and different from a traditional Santa doll.
The fluffy white beard, tiny face, and pointed hat give it a festive look.
With a little yarn, a crochet hook, and some basic stitches, you can make a lovely holiday accessory for your keys, handbag, or Christmas tree.
Try classic red and white for a traditional Santa, or experiment with pastel colors for something new.
Make one for yourself or create several as handmade Christmas gifts.
Enjoy every stitch and have fun bringing your little Santa to life.
For more easy crochet patterns, cute keychains, and beginner-friendly DIY projects, explore USESEW.com.