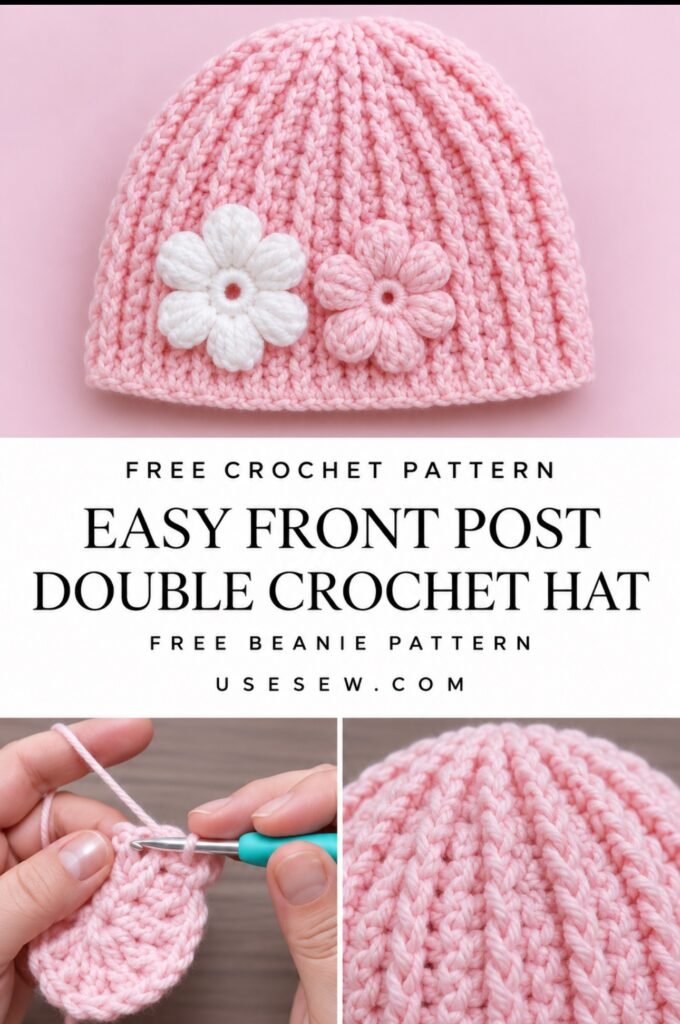
This front post double crochet hat is a lovely project to try.
The hat has a beautiful raised texture that looks almost like knitting, but it is made entirely with a crochet hook.
You only need yarn, a crochet hook, and two main stitches: double crochet and front post double crochet.
The design starts at the top of the head with a small crochet ring.
Then, you increase the stitches to make a round crown.
After the crown is complete, you crochet straight down to create the sides of the hat.
The original tutorial shows three versions in pink, yellow, and light blue.
You can choose the yarn and hook size that best suits your project.
In this guide, you will learn how to make the starting ring, crochet raised stitches, shape the crown, and finish your beanie neatly.
You will also find a beginner stitch guide, round-by-round pattern tables, sizing information, helpful tips, and the original video tutorial.
Let’s make a cozy crochet hat!
What Is a Front Post Double Crochet Hat?
A front post double crochet hat is a handmade beanie with beautiful raised stitches.
The raised texture is made with a special stitch called front post double crochet, often shortened to FPdc.
Instead of inserting your hook into the two loops at the top of a stitch, you work around the body, or post, of the stitch below.
This makes the stitch stand out from the surface of the crochet fabric.
When front post stitches are repeated in the same positions over several rounds, they create lovely vertical lines.
The finished hat has a soft, textured appearance.
The original pattern uses a mixture of regular double crochet stitches and front post double crochet stitches.
The crown is shaped with increases, and the lower part is worked without increases.
This creates a simple top-down crochet beanie.
Why You Will Love This Crochet Hat Pattern
There are many reasons to try this project.
- Beautiful texture: Front post stitches create raised vertical details.
- Simple construction: The hat is made from the top down.
- Only two main stitches: Double crochet and front post double crochet.
- Three size examples: Choose a yarn-and-hook combination for a smaller or larger hat.
- No sewing seams: The main hat is crocheted in joined rounds.
- Easy to customize: Try different colors and yarn textures.
- Cozy handmade gift: Make a hat for a friend or family member.
- Useful new skill: Learn a stitch you can also use in scarves, bags, and blankets.
Once you understand how to work around a stitch post, the raised pattern becomes much easier to follow.
Crochet Hat Project Details
Project Detail
Information
Project name
Front Post Double Crochet Hat
Skill level
Confident beginner
Crochet terms
US terminology
Main stitches
Double crochet and front post double crochet
Starting ring
5 chains joined into a ring
First round
12 double crochet stitches
Crown shaping
Rounds 1–6
Straight sides
Rounds 7–15
Total rounds
15
Construction
Top-down crochet in joined rounds
Finishing
Fasten off and weave in yarn ends
Optional decoration
Crochet flower
Original creator
Crochet and Knitting Japan
You do not need to sew the main hat together.
The entire shape is built in joined circular rounds.
Front Post Double Crochet Hat Size Guide
The original designer shows three hat sizes using different yarns and hook sizes.
Hat Color
Yarn
Crochet Hook
Suggested Head Circumference
Pink
Medium-weight yarn
4.0 mm
48–52 cm
Yellow
Thick, bulky yarn
5.0 mm
53–58 cm
Light Blue
Thick, bulky yarn
6.0 mm
58–63 cm
These measurements refer to the head sizes described by the original creator.
The actual size of your finished hat will depend on your yarn, hook, and crochet tension.
How to Choose Your Hat Size
Before starting, measure around the head where the hat will sit.
Use a flexible measuring tape.
Wrap it around the forehead and the widest part of the head.
Do not pull the tape too tightly.
Compare the measurement with the size examples above.
If you are making the hat as a gift, ask for the recipient’s head measurement when possible.
A small crochet sample is also helpful because different yarns may produce different finished sizes.
Materials Needed
Gather your yarn and tools before starting.
Material
Details
Yarn
Medium-weight or thick yarn, depending on your chosen version
Crochet hook
4.0 mm, 5.0 mm, or 6.0 mm
Tapestry needle
For weaving in yarn ends
Scissors
For cutting yarn
Stitch marker
Optional, to mark the beginning of a round
Measuring tape
For checking head circumference and hat height
Crochet chart
Original creator’s chart for the increase placements
Extra yarn
Optional, for a decorative flower
The original tutorial does not specify one universal yarn quantity for all three sizes.
The amount you need depends on the yarn length, thickness, and final hat size.
Helpful Yarn Tip
Choose a yarn that feels comfortable against the skin.
A smooth yarn is especially good when learning front post double crochet.
It helps you see the raised stitches clearly.
Very fluffy yarn can make it difficult to identify the stitch posts.
If this is your first textured crochet hat, a light-colored yarn can make the stitch pattern easier to follow.
The True Beginner Crochet Stitch Guide
New to front post crochet?
Don’t worry!
The stitch is easier once you know where to insert your hook.
All instructions use US crochet terminology.
Stitch
Abbreviation
Meaning
Chain
ch
Pull yarn through the loop on your hook
Double Crochet
dc
A tall crochet stitch
Front Post Double Crochet
FPdc
A double crochet worked around the front of a stitch post
Slip Stitch
sl st
A small stitch used to join rounds
Increase
inc
Add an extra stitch at the indicated position
Stitch
st
One crochet stitch
Round
rnd
One circular row of crochet
Repeat
rep
Work the same instructions again
Yarn Over
YO
Wrap the yarn over your hook
Fasten Off
FO
Secure the final loop and cut the yarn
How to Make a Chain Stitch
- Make a slip knot.
- Place the loop on your crochet hook.
- Yarn over.
- Pull the yarn through the loop.
You have made one chain.
Repeat to make more chains.
How to Make a Double Crochet
A double crochet is taller than a single crochet.
- Yarn over.
- Insert your hook into the next stitch.
- Yarn over and pull up a loop.
- You now have three loops on your hook.
- Yarn over and pull through two loops.
- Yarn over again.
- Pull through the remaining two loops.
You have made one double crochet!
How to Make a Front Post Double Crochet
This is the special stitch used in the hat.
- Yarn over.
- Look at the stitch in the round below.
- Find the vertical body of that stitch. This is called the post.
- Insert your hook from front to back beside the post.
- Bring the hook back to the front on the other side of the post.
- Yarn over and pull up a loop around the post.
- Yarn over and pull through two loops.
- Yarn over again.
- Pull through the final two loops.
You have made one front post double crochet!
The stitch wraps around the post and sits slightly forward.
This is what creates the raised texture.
Double Crochet vs. Front Post Double Crochet
Double Crochet
Front Post Double Crochet
Worked into the top loops
Worked around the stitch post
Makes an even surface
Makes a raised surface
Used throughout the crown
Creates textured columns
Abbreviation: dc
Abbreviation: FPdc
Both stitches have a similar height.
The main difference is where you place your hook.
How to Join a Crochet Round
The original pattern uses joined rounds.
At the beginning of most rounds, chain 3.
This chain counts as the first double crochet stitch.
At the end, insert the hook into the third chain of the starting chain-3.
Make a slip stitch to join.
Be careful not to add an extra stitch by crocheting into the joining slip stitch.
Choosing the Best Yarn for Your Crochet Beanie
The yarn you choose changes the look and size of your hat.
For a smaller hat, the creator uses medium-weight yarn and a 4.0 mm hook.
For larger examples, thicker yarn is paired with 5.0 mm and 6.0 mm hooks.
You can also make your own color choices.
Beautiful Crochet Hat Color Ideas
Yarn Color
Style
Soft Pink
Sweet and cozy
Cream White
Simple and classic
Mustard Yellow
Warm and cheerful
Light Blue
Calm and gentle
Sage Green
Modern and natural
Warm Beige
Neutral winter style
Charcoal Gray
Timeless and versatile
Burgundy
Rich and elegant
Lavender
Soft and feminine
Solid colors are especially lovely because they make the raised stitches easy to see.
Important Crochet Hat Pattern Notes
Read these notes before starting.
- The hat begins with a five-chain ring.
- Chain 3 at the beginning of a double crochet round counts as the first stitch.
- Round 1 has 12 double crochet stitches, including the starting chain-3.
- Rounds 2–6 include increases to shape the crown.
- Regular double crochet and front post double crochet are combined to create the texture.
- Front post stitches are worked around the posts of the stitches below.
- Join each round with a slip stitch.
- Rounds 7–15 are worked without increases.
- The final hat size depends on your yarn, hook, and tension.
The original crochet chart is particularly helpful for following the precise positions of the increases and raised stitches in Rounds 3–6.
How to Crochet a Front Post Double Crochet Hat
Now it is time to start the hat!
We will begin with a small ring, make the round crown, and then build the sides.
Step 1: Make the Starting Ring
Take your yarn and crochet hook.
Make a slip knot.
Chain 5.
Insert your hook into the first chain.
Make a slip stitch to join the chain into a small circle.
You now have a ring in the center of your hat.
Step 2: Crochet Round 1
Chain 3.
This beginning chain counts as your first double crochet.
Now work 11 more double crochet stitches into the center of the ring.
You should have a total of 12 stitches, including the starting chain-3.
Insert your hook into the third chain of the beginning chain-3.
Join with a slip stitch.
Round 1 is complete!
You now have a small circle that will become the top of your hat.
Step 3: Crochet Round 2
Round 2 introduces the raised stitch.
You will increase the stitch count from 12 to 24.
Chain 3.
This counts as the first double crochet of the new round.
Now work a front post double crochet around the starting chain-3 post from Round 1.
The post stitch creates a raised line beside the regular double crochet.
Continue around the circle, working a regular double crochet into the top of each following stitch and a front post double crochet around the same stitch’s post.
Each stitch position from Round 1 produces two stitches in Round 2.
At the end, you should have 24 stitches.
Join with a slip stitch into the third chain of the beginning chain-3.
You can now see the start of the raised pattern.
Step 4: Crochet Round 3
Now we will make the crown wider.
Start with chain 3.
Continue using regular double crochet and front post double crochet.
Where the previous round has a raised front post stitch, work around its post to continue the textured line.
At the increase positions, add the extra stitch indicated in the original chart.
Round 3 increases the crown from 24 to 36 stitches.
Keep the stitches evenly distributed around the circle.
Join with a slip stitch to finish the round.
Step 5: Crochet Round 4
Chain 3.
Continue the raised stitch pattern.
This round spaces the increases farther apart than in Round 3.
Work the regular double crochet stitches into their top loops.
Work front post double crochet stitches around the appropriate posts.
Place the increases according to the creator’s Round 4 chart.
The crown increases from 36 to 48 stitches.
Join with a slip stitch at the end.
Your crown will now be noticeably larger.
Step 6: Crochet Round 5
Chain 3.
Continue working the double crochet and front post double crochet pattern.
Round 5 uses fewer increases than the earlier crown rounds.
The increases are spaced around the circle to help the crown grow more gently.
Follow the original chart for the precise increase locations.
The narrated increase sequence indicates a total of six additional stitches in this round, bringing the count from 48 to 54.
Join with a slip stitch.
Step 7: Crochet Round 6
Now we will finish shaping the crown.
Chain 3.
Continue following the raised stitch pattern.
Make the final crown increases at the positions shown in the original crochet chart.
The narrated sequence indicates six more increases, taking the crown from 54 to 60 stitches.
Join with a slip stitch.
The increasing part of the pattern is now complete.
Gently place the crochet circle over the top of the intended wearer’s head to check the width.
Crochet Hat Crown: Round-by-Round Table
Round
Main Instructions
Stitch Count
1
12 dc into the chain-5 ring
12
2
dc and FPdc increases around each previous stitch
24
3
Continue textured pattern with 12 increases
36
4
Continue textured pattern with 12 increases
48
5
Continue textured pattern with 6 spaced increases
54
6
Continue textured pattern with 6 spaced increases
60
The original creator’s chart should be followed for the exact placement of the FPdc stitches and increases. These totals summarize the increase sequence described in the tutorial.
How to Crochet the Hat Sides
Now the crown is complete!
From this point, you do not need to increase anymore.
The next rounds will turn the flat crown into a hat.
Step 8: Crochet Round 7
Chain 3.
Continue using the regular double crochet and front post double crochet stitches.
For each ordinary double crochet, work into the top of the stitch below.
For each raised stitch, work around the matching post from the previous round.
Do not make any increases.
Keep the same number of stitches all the way around.
Join with a slip stitch.
The fabric will begin to curve downward.
Step 9: Crochet Rounds 8–10
Continue working the same stitch pattern.
At the start of each round:
Chain 3.
Work the regular double crochet stitches into the appropriate top loops.
Work the front post double crochet stitches around the raised posts below.
Do not increase.
Join with a slip stitch to complete each round.
You will notice the textured lines becoming longer.
The hat will begin to look more like a small tube.
Step 10: Crochet Rounds 11–14
Continue repeating the same pattern.
Keep your tension even.
Make sure the front post stitches follow the textured lines from the rounds below.
Do not increase or decrease.
Join each round neatly.
As you work, the sides of the hat will become taller.
Try the hat on carefully when it is long enough to check the fit.
Step 11: Crochet Round 15
This is the final round in the original tutorial.
Chain 3.
Continue working the regular double crochet and front post double crochet pattern.
Work one stitch for each stitch position around.
Do not increase.
When you reach the end, join with a slip stitch into the third chain of the beginning chain-3.
Your 15-round textured hat is complete!
Crochet Hat Sides: Round Table
Round
Instructions
Increase
7
Follow dc and FPdc texture
No
8
Repeat the textured pattern
No
9
Repeat the textured pattern
No
10
Repeat the textured pattern
No
11
Repeat the textured pattern
No
12
Repeat the textured pattern
No
13
Repeat the textured pattern
No
14
Repeat the textured pattern
No
15
Repeat the textured pattern
No
All these rounds maintain the stitch count established at the end of Round 6.
How to Finish Your Crochet Hat
The last step is hiding the yarn end.
Step 12: Fasten Off
After joining Round 15, cut your yarn, leaving a tail long enough to weave in.
Pull the tail through the final loop.
Gently tighten it.
Turn your hat inside out.
Step 13: Weave In the Yarn End
Thread the yarn tail onto your tapestry needle.
Pass the needle under several stitches on the inside of the hat.
Change direction and weave through a few more stitches.
Try to follow a raised stitch or an area where the yarn will be less visible.
Do not pull so tightly that the fabric gathers.
Trim the extra yarn.
Step 14: Shape Your Finished Hat
Turn the hat right side out.
Gently smooth the crown.
Adjust the raised stitch lines with your fingers.
Check that the lower edge is even.
Try the hat on to check the fit.
Your front post double crochet hat is finished!
Complete Crochet Hat Pattern Summary
Section
What to Do
Starting Ring
Ch 5, join with sl st
Round 1
12 dc into the ring
Round 2
Increase using dc and FPdc
Rounds 3–4
Continue increasing the crown
Rounds 5–6
Make the final spaced increases
Rounds 7–15
Work evenly without increases
Finishing
Fasten off and weave in ends
Optional
Add a decorative crochet flower
Watch the video Front Post Double Crochet Hat Tutorial
Original pattern and tutorial: Crochet and Knitting Japan (クロッシェジャパン).
You can also view the creator’s original crochet hat chart and size notes.
Helpful Crochet Hat Tips for Beginners
Here are some tips to make your hat look neat and comfortable.
Tip
Advice
Count your stitches
Check the stitch count after each crown round
Practice FPdc
Try a few raised stitches before starting
Use a stitch marker
Mark the beginning of each round
Keep even tension
Avoid tight and loose stitches in the same round
Watch your increases
Follow the original chart during crown shaping
Follow raised columns
Work FPdc around the matching posts
Check the fit
Measure the head and try on the hat
Weave in ends neatly
Hide tails on the inside of the hat
Why Does My Hat Look Like It Has Raised Lines?
That is the special front post stitch!
Each FPdc is worked around the vertical post of a stitch below.
This pushes the stitch forward and creates a textured line.
Why Is My Hat Crown Wavy?
You may have added extra increases or changed your tension.
Check your stitch count against the crown table.
If you have too many stitches, the fabric may ripple.
Why Is My Hat Too Tight?
Your stitches may be tighter than the creator’s.
Your yarn may also be thinner or less stretchy.
Try making a small swatch with a larger hook, then compare the fit before continuing.
Why Is My Hat Too Loose?
Your hook may be too large for the yarn, or your stitches may be loose.
Try a smaller hook or a different yarn.
Why Are My Raised Stitches Uneven?
You may be working into the top loops instead of around the stitch posts.
Check that the hook passes around the post from front to back to front.
Why Is My Joining Seam Visible?
Joined rounds sometimes create a visible line.
Keep the starting chain-3 even and join into its third chain.
Avoid accidentally working into the slip-stitch join as an extra stitch.
Creative Ways to Customize Your Crochet Hat
One of the best things about crochet is making something in your own style.
Make a Soft Pink Crochet Hat
Use medium-weight pink yarn with a hook that gives the correct gauge.
This makes a sweet, simple hat with beautiful raised stitches.
Make a Yellow Winter Hat
Try thick yellow yarn for a cheerful winter look.
The raised stitches create a lovely texture in a bright solid color.
Make a Light Blue Beanie
Choose soft light blue yarn for a calm, cozy look.
This color is beautiful for cold-weather accessories.
Add a Crochet Flower
The original creator shows a hat decorated with a crochet flower.
You can make a separate small flower and sew it securely to one side of the finished hat.
Choose a flower color that contrasts with the hat.
Make a Matching Scarf
Use the same yarn color to make a scarf.
You can combine regular double crochet and raised stitches to create a matching texture.
Try a Two-Color Version
Use one color for most of the hat and a contrasting color for the last few rounds.
This creates a simple color-block effect.
If you change colors, make sure the new yarn has a similar thickness and stretch.
How to Style Your Crochet Beanie
A handmade crochet hat can be a lovely accessory for cooler days.
- Casual winter outfit: Wear it with a warm coat and scarf.
- Weekend walks: Choose soft wool or acrylic-blend yarn.
- Handmade gift: Make a hat in the recipient’s favorite color.
- Matching set: Pair the hat with a crochet scarf.
- Simple everyday look: Choose beige, gray, cream, or navy.
- Colorful accessory: Try pink, mustard yellow, or lavender.
The vertical raised stitches add texture without needing a complicated decoration.
More Easy Crochet Projects to Try
If you enjoyed making this crochet hat, you may like these USESEW projects.
Try our Easy Tunisian Crochet Scarf for another cozy project with a beautiful textured look.
You can also make an Easy Crochet Market Bag if you enjoy practical handmade accessories.
For a fun home project, explore the Easy Crochet Cat Basket.
Browse our Crochet Hats collection for more headwear inspiration.
How to Care for Your Crochet Hat
A little care can help your handmade hat stay beautiful.
Care Step
What to Do
Washing
Follow the care instructions on your yarn label
Hand Washing
Use a gentle detergent if suitable for your yarn
Drying
Lay flat and reshape while damp
Storage
Keep in a clean, dry place
Raised Stitches
Avoid pulling or snagging the textured columns
Flower Decoration
Check that any sewn embellishment remains secure
Yarn Ends
Repair loose ends if needed
Avoid hanging a wet crochet hat by its lower edge because the weight of the water can stretch the fabric.
Let it dry completely before storing.
Frequently Asked Questions
Is this front post double crochet hat good for beginners?
It is suitable for confident beginners who already know chain, slip stitch, and double crochet. The front post stitch and increase rounds may need a little extra practice.
What is a front post double crochet?
A front post double crochet is a double crochet stitch worked around the vertical body of another stitch instead of its top loops. It creates a raised texture.
What stitches are used in this hat?
The pattern mainly uses chain stitches, double crochet, front post double crochet, and slip stitches.
Does this crochet hat look like knitting?
The raised stitches can give the hat a knit-like textured appearance, but the fabric is made entirely with crochet.
How many rounds are in this crochet hat?
The original pattern has 15 rounds.
How many rounds are used for the crown?
Rounds 1–6 create the crown with increases.
When do I stop increasing?
The original pattern stops increasing after Round 6.
What happens in Rounds 7–15?
You continue the textured stitch pattern without making additional increases.
Can I make this hat in different sizes?
Yes. The creator shows three yarn-and-hook combinations for different head circumferences. Measure your head and check your gauge before choosing a version.
What hook size should I use?
The original examples use 4.0 mm, 5.0 mm, and 6.0 mm hooks, depending on the yarn and intended size.
Can I use acrylic yarn?
Yes. Choose a yarn that feels soft and comfortable. Check the thickness and make a sample to test the gauge.
Can I use wool yarn?
Yes. Wool or a wool blend can be a lovely choice for a warm winter hat. Follow the yarn care instructions.
Can I add a flower to the hat?
Yes. A small crochet flower makes a sweet optional decoration. Sew it securely to one side.
Why do I need a crochet chart?
The chart helps show exactly where the double crochet, raised stitches, and increases belong, especially during the shaping rounds.
Where can I watch the original tutorial?
You can watch the complete Front Post Double Crochet Hat tutorial from Crochet and Knitting Japan using the link above.
Final Thoughts
This front post double crochet hat is a lovely way to create a cozy winter accessory using simple crochet techniques.
The raised stitches give the beanie a beautiful texture that makes it look special.
The pattern begins with a small circle at the top, grows into a rounded crown, and finishes with straight sides.
You can choose soft pink, cheerful yellow, gentle light blue, or any color you love.
The original tutorial offers three helpful yarn-and-hook size examples.
Take your time with the crown increases, practice the front post stitch, and enjoy seeing the texture grow with every round.
You can wear your finished hat, give it as a thoughtful handmade gift, or make a matching winter accessory set.
For more easy crochet patterns, cozy handmade accessories, and beginner-friendly tutorials, explore USESEW.com.
I’m Happy crocheting!